
Did you know that macrame — once a staple of 1970s home décor — became one of the top trending crafts in the US by 2020, with Google searches for macrame tutorials growing over 300% in a single year? The craft never really left. It just got better. And one of the easiest places to start is a bracelet.
Making a macrame bracelet as a beginner takes less than an hour. You don’t need a loom, a machine, or years of practice. You need cord, scissors, and a little patience. This guide walks you through every step — from choosing the right cord to finishing a bracelet that actually holds together. You’ll also find sizing tips, a troubleshooting section, and answers to the questions beginners ask most.
What You’ll Need Before You Start
You don’t need much. That’s one of the best things about macrame.
Here’s a quick list of materials for one basic macrame bracelet:
- Macrame cord — 1mm to 2mm thickness works best for bracelets
- Scissors — sharp ones make clean cuts
- Tape or a clipboard — to anchor your work while you knot
- A ruler or measuring tape — for wrist sizing
- Optional: a button or bead — for a sliding closure
Avoid thick rope-style cord (3mm or above) for bracelets. It creates bulky knots that are uncomfortable to wear and hard to control for a beginner. Thin cord in the 1–2mm range gives you clean, defined knots without the bulk.
You can find supplies at most craft stores like Joann or Michaels, or browse macrame supplies on Etsy for specialty options, including coloured waxed cotton cord and natural cotton string in beginner-friendly weights.
Choosing the Right Cord

Cord choice makes or breaks your first bracelet. Pick the wrong type and your knots slide, fray, or fall apart.
For a first bracelet, waxed cotton cord is the best option. It’s smooth, slightly stiff, and holds knots firmly without slipping. Natural cotton macrame cord is softer and more common, but it can fray at cut ends — manageable, but not ideal for your very first project.
If you want to explore more options before buying, our guide on thin cord for jewellery making covers weights, textures, and what works best for small-scale projects.
Here’s a quick breakdown:
| Cord Type | Best For | Beginner-Friendly? |
|---|---|---|
| Waxed cotton (1–1.5mm) | Bracelets, anklets | ✅ Yes — holds knots well |
| Natural cotton (1–2mm) | Bracelets, keychains | ✅ Yes — widely available |
| Nylon/polyester (1mm) | Waterproof bracelets | ⚠️ Slippery — trickier for beginners |
| Jute (2mm+) | Wall hangings, not bracelets | ❌ Too rough and stiff |
| Hemp cord (1mm) | Earthy-style bracelets | ✅ Works well, slightly rougher |
For a beginner macrame bracelet, stick with 1mm waxed cotton or 1.5mm natural cotton. Both are forgiving, inexpensive, and widely available. You can read more about macrame cord types and weights on The Spruce Crafts, which breaks down the differences clearly.
How to Measure Your Wrist for a Bracelet
Skipping this step is the most common beginner mistake. A bracelet that’s too tight cuts off circulation. One that’s too loose falls off.
Use a soft measuring tape and wrap it around your wrist, just below the wrist bone. Note the measurement in inches. Then add half an inch to one inch depending on how loose you like your bracelets. A snug fit uses +0.5 inches. A comfortable everyday fit uses +0.75 to 1 inch.
If you don’t have a soft measuring tape, learn how to measure your wrist accurately using a strip of paper and a ruler. It takes about 30 seconds and saves you the frustration of finishing a bracelet that won’t fit.
Average wrist sizes in the US:
- Women’s average: 6 to 7 inches
- Men’s average: 7 to 8 inches
- Teen wrists: typically 5.5 to 6.5 inches
Cut your working cord to at least four times your target bracelet length. For a 7-inch bracelet, you’ll need roughly 28 inches of working cord per strand, plus extra for the finishing knots.
The Knots You Need to Know
You only need two knots to make your first macrame bracelet. Don’t let the variety of macrame knots overwhelm you — experienced makers use dozens, but beginners start with the basics.
1. The Square Knot
This is the foundation knot in macrame. It creates a flat, even pattern and works on any cord type. You use two outer cords and two inner cords (called “filler cords”). The outer cords cross over and under the fillers in alternating directions to form each knot.
2. The Half Hitch Knot
This is simpler than the square knot. You loop one cord around another and pull through. Repeat it in one direction for a spiral effect, or alternate directions for a flat chain. Many beginner bracelets use a spiral half hitch because it looks impressive but takes minutes to learn.
You can learn exactly how to tie the square knot used in bracelets in our full knots guide, which covers the technique with step-by-step detail. Reading it before you start will save you a lot of confusion.
Step-by-Step: How to Make Your First Macrame Bracelet
This pattern uses square knots. It creates a classic, flat bracelet that looks polished and works with any cord colour. Set aside about 45 to 60 minutes for your first attempt.
Step 1: Cut your cord
Cut 4 strands of cord, each about 24–28 inches long (adjust based on your wrist measurement). The two middle strands are your filler cords. The two outer strands do the knotting.
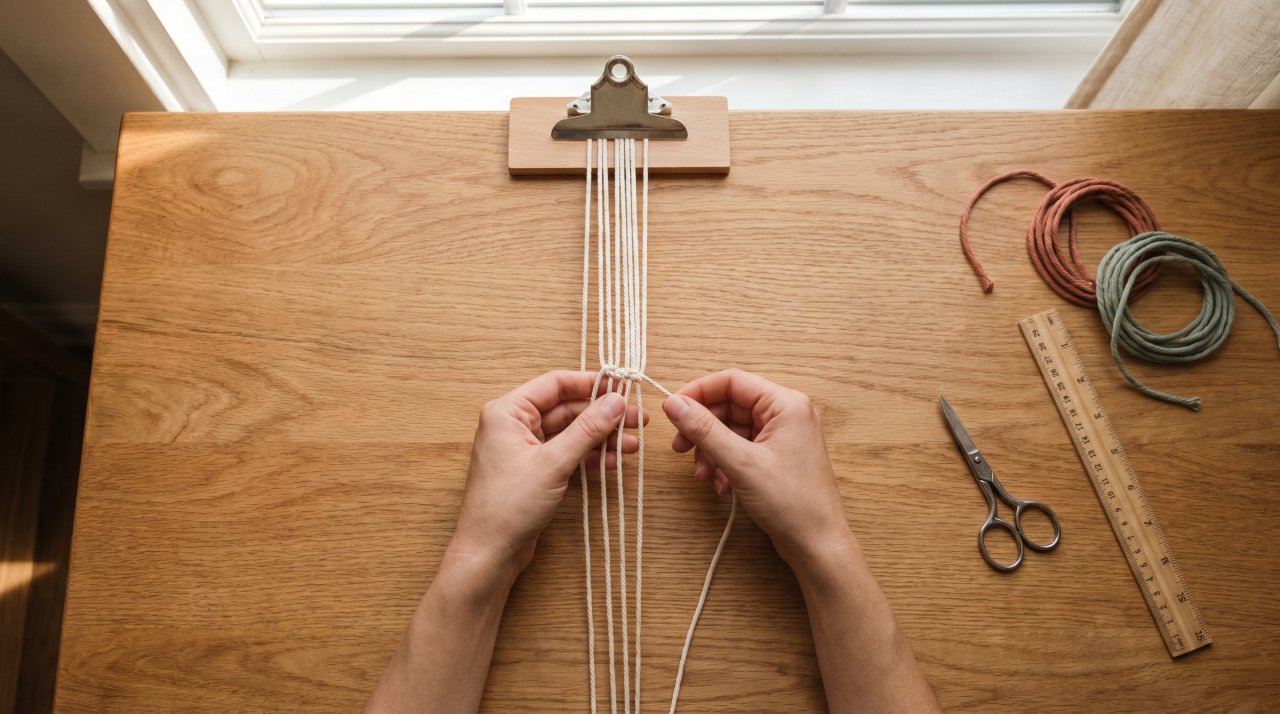
Step 2: Anchor your work
Fold all four strands in half and loop them onto a clipboard clip or tape the folded end to a flat surface. This keeps the cords from sliding around while you knot.
Step 3: Tie your first square knot
Take the left outer cord and cross it over the two filler cords, forming a “4” shape. Take the right outer cord and bring it behind the fillers, through the loop on the left. Pull both outer cords gently to tighten. That’s the first half. Repeat in the opposite direction (right cord over first this time) to complete the full square knot.
Step 4: Continue knotting
Keep tying square knots down the length of the filler cords. Push each knot up firmly toward the previous one. Loose knots create gaps in the pattern — that’s normal at first, but aim for consistency.
Step 5: Check your length
After every 10 to 12 knots, measure the knotted section against your wrist. Stop when you’re about half an inch short of your target length (you’ll need that space for the closure).
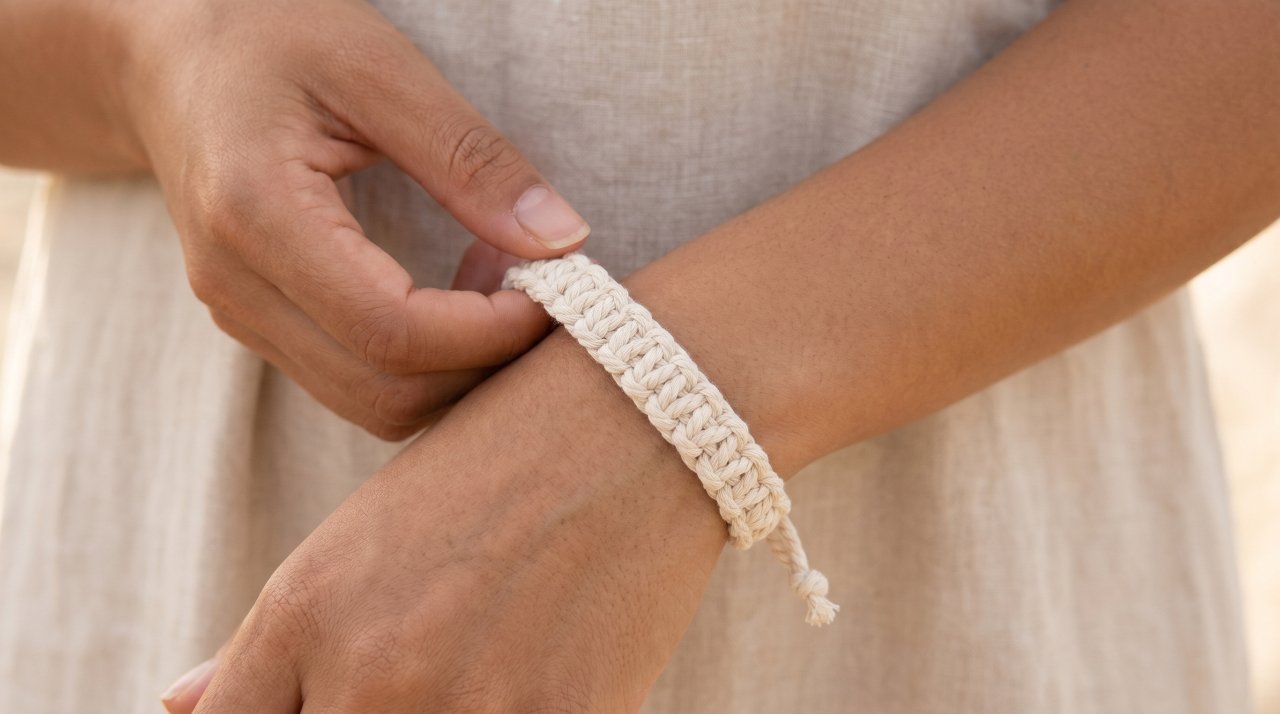
Step 6: Add a sliding closure
A sliding closure lets you adjust the bracelet size. Bring both ends of the bracelet together so they overlap by about an inch. Take a short separate piece of cord (about 6 inches) and tie a series of square knots around both bracelet ends. This creates a sliding knot barrel that tightens and loosens.
Step 7: Trim and seal
Cut the loose cord ends to about a quarter inch. Use a lighter to lightly melt the ends of synthetic cord — this stops fraying instantly. For natural cotton cord, apply a tiny drop of craft glue to each end instead. Never use a lighter on cotton or hemp cord — it burns, not melts.
Common Beginner Mistakes (And How to Fix Them)

Every beginner makes these mistakes. Knowing them in advance saves time and frustration.
Mistake 1: Cutting cord too short
Short cord is the most common problem. You can’t add length once it’s cut. When in doubt, cut longer — you can always trim excess at the end.
Mistake 2: Uneven knot tension
Some knots are tight, others loose, and the pattern looks inconsistent. Fix this by pulling both outer cords at the same time with equal pressure on every knot. It takes a few rows to find your rhythm.
Mistake 3: Losing track of which cord is which
After a few knots, the working cords and filler cords can swap positions visually. Put a small piece of tape on your filler cords before you start. Remove it when you’re done.
Mistake 4: The bracelet is too stiff
Over-tightened knots create a stiff bracelet that’s uncomfortable. You want snug knots, not maximum-force knots. If your wrist aches after wearing it for an hour, the knots are probably too tight.
How Long Does It Actually Take?
Be honest with yourself about time. Your first bracelet will take longer than you expect — and that’s completely fine.
A simple square knot bracelet with no embellishments takes most beginners 45 to 90 minutes for their first attempt. By the third or fourth bracelet, you’ll complete the same project in 20 to 30 minutes. Speed comes with repetition, not reading more tutorials.
The Craft Yarn Council notes that repetitive hand crafts like knotting and weaving are also associated with reduced stress and improved focus — so even a slower session has benefits beyond the finished bracelet.
Caring for Your Finished Bracelet
A macrame bracelet is more durable than it looks, but it does need basic care.
For cotton cord bracelets: hand wash gently in cool water with mild soap. Lay flat to dry — don’t twist or wring the cord. For waxed cotton: wipe with a damp cloth only. Submerging waxed cord in water breaks down the wax coating and weakens the knots.
Avoid wearing your bracelet in chlorinated pools or salt water. Both break down natural fibres faster than fresh water. Remove it before applying sunscreen or lotion — oils from skin products cause cotton fibres to weaken and discolour over time.
Frequently Asked Questions
What is the best macrame cord for bracelets?
Waxed cotton cord in 1mm to 1.5mm thickness is the best choice for beginners. It holds knots firmly, resists fraying, and comes in a wide range of colours. Natural cotton cord in the same thickness is a close second and is easier to find in craft stores.
How long does it take to make a macrame bracelet?
Your first bracelet will take 45 to 90 minutes. Once you’ve practised the square knot a few times, you’ll make the same bracelet in 20 to 30 minutes. The knotting itself is fast — it’s the setup and measuring that takes the most time at first.
Is macrame easy for beginners?
Macrame bracelets are one of the most beginner-friendly macrame projects. You only need to learn one or two knots, and the materials cost very little. The learning curve is real but short — most people feel comfortable after finishing their second or third bracelet.
What length of cord do I need for a macrame bracelet?
Cut each cord strand to at least four times the finished bracelet length. For a 7-inch bracelet, that means roughly 28 inches per strand. Go longer rather than shorter — running out of cord mid-project is a frustrating and avoidable problem.
What knots do beginners use in macrame?
The square knot is the most used knot in macrame and the best starting point. The half hitch knot (and its spiral variation) is the second most common beginner knot. Together, these two knots produce most basic macrame bracelet patterns.
Can I make a macrame bracelet without any tools?
Yes. You need scissors and something to anchor your work — a clipboard, a safety pin attached to a pillow, or tape on a flat surface all work. You don’t need a macrame board, T-pins, or any specialist tools for a simple bracelet.
Ready to Make Your Next Project?
The most important takeaway from this guide is simple: start with the square knot, use the right cord, and don’t cut too short. Those three things will get you through your first bracelet without major frustration.
Once you’ve finished your first bracelet, you have more skills than you think. The square knot you just learned is the same knot used in wall hangings, plant hangers, and bags. Making a bracelet first is the fastest way to build muscle memory before moving to larger projects.
Your next step: gather your materials today and knot your first bracelet this week. Then check out our macrame wall hanging tutorial to see how far those same knots take you.