
Most macrame guides dump 12 to 17 knots on you at once — then leave you tangled in cords wondering where you went wrong. Here’s the truth: you only need 5 knots to make beautiful, finished macrame pieces. Learn those five in the right order, understand why they go wrong (and how to fix them), and you’ll be hanging your first wall piece within a week.
This guide is different from the others. You’ll get honest difficulty ratings for each knot, the exact cord length formula to cut before you start, and a troubleshooting section covering the mistakes that silently kill beginner projects. By the end, you’ll know which knot to try today.
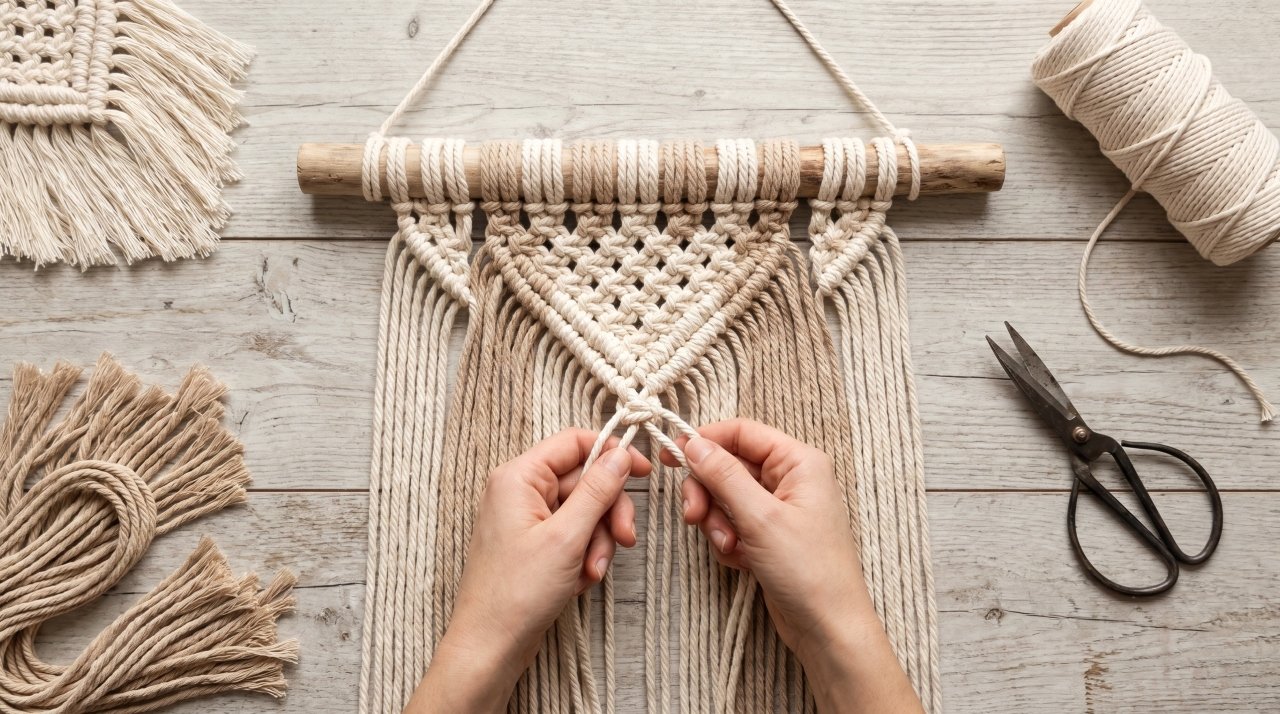
What You Need Before You Touch a Single Knot
You don’t need much. In fact, keeping your setup simple makes learning faster.
Cord: Start with 3mm to 4mm single-strand or three-ply cotton rope. It’s soft on your fingers during long practice sessions, holds knots clearly so you can see your work, and — this matters — it unties easily when you make a mistake. Avoid synthetic cord for now. It’s slippery and won’t hold tension the way cotton does.
Dowel or branch: A wooden dowel rod (12 to 18 inches) gives you a stable anchor point. You can tape two pencils together across a doorframe in a pinch — it works.
Sharp scissors: Dull scissors crush cotton fibers and leave frayed ends that make finishing look messy. One dedicated pair for macrame cord is worth it.
That’s the whole list. Don’t buy beads, rings, or specialty tools until you’ve tied your first 100 square knots.
How Much Cord to Cut (The Formula Beginners Always Miss)
Every guide tells you what to tie. Almost none tell you how long to cut your cord before you begin — which is the #1 reason beginners run out of cord mid-project.
Use this rule: cut each cord 4 times the length of your finished piece. For a 12-inch wall hanging, cut your cords 48 inches (4 feet) long. Then fold each cord in half to mount it on the dowel, giving you two working strands of 24 inches each.
For projects with dense knotting (lots of square knots close together), go up to 5 times the finished length. When in doubt, cut longer — you can always trim the fringe.
The 5 Macrame Knots You Actually Need (Taught in Order)
Learn these in sequence. Each one builds on the previous.
1. The Lark’s Head Knot — Difficulty: Beginner (5 minutes to learn)
This is the knot you use to mount every cord onto your dowel. You’ll tie it first on every single project, so learn it cold.
How to tie it:
- Fold your cord in half so both ends are even.
- Push the folded loop over the top of your dowel, away from you.
- Pull both loose ends down through the loop.
- Tighten.
That’s it. The loop sits on top, the two working ends hang down. A reverse lark’s head is the same motion but you push the loop under the dowel first — it creates a slightly different look at the top and is worth practicing once you’ve got the standard version.
Why it goes wrong: If your knot looks loose or the two cords hang unevenly, you didn’t pull both strands through the loop at the same time. Redo it, pulling both ends together in one smooth motion.
What you’ll use it for: Every wall hanging, plant hanger, and garland starts with a row of lark’s head knots.
2. The Square Knot — Difficulty: Beginner–Intermediate (30 minutes to feel comfortable)
The square knot is the foundation of macrame. If you only ever learn one knot from this guide, make it this one. It creates the flat, woven sections you see in nearly every macrame piece.
You need four cords: two filler cords in the middle (they don’t move) and two working cords on the outside (they do all the work).
How to tie it:
- Cross the left working cord over both filler cords, then under the right working cord. You’ve made a loose number “4” shape.
- Pull the right working cord under the filler cords and up through the loop on the left side.
- Tighten. This is the first half of your square knot.
- Now repeat the same motion from the right side — right cord over fillers, under left cord, left cord under fillers and through the loop on the right.
- Tighten both halves snugly together.
One complete square knot = both steps above. Repeating just step 1 over and over (same direction each time) creates a half square knot spiral, which twists beautifully on its own.
Why it goes wrong: The most common problem is uneven tension — one side pulled tight, the other loose. Pull both working cords at the same time when tightening, applying equal pressure from left and right simultaneously. Also, if your finished knot looks like a granny knot, you completed both halves in the same direction instead of reversing. The second half must mirror the first.
What you’ll use it for: Wall hangings, plant hangers, table runners, bags — square knots build almost every flat pattern in macrame.
3. The Half Hitch Knot — Difficulty: Beginner (15 minutes)
The half hitch is the simplest building block in macrame, and understanding it makes the next knot (double half hitch) much easier.
Take one working cord and loop it over a filler cord, then pass the working cord’s end through the loop you just created. Pull snug. That single motion is a half hitch.
On its own it’s not very stable — it needs a second half hitch alongside it to lock into place. Which brings you to the most useful pattern knot you’ll learn.
4. The Double Half Hitch Knot — Difficulty: Intermediate (1–2 hours to feel confident)
The double half hitch (DHH) is where macrame gets interesting. It’s two half hitches tied consecutively around the same filler cord. What makes it powerful is direction — you can guide your filler cord horizontally, diagonally, or vertically, and your working cords follow it. That’s how macrame creates chevrons, diamonds, and geometric shapes.
Horizontal DHH: Pin your filler cord across the work horizontally (tape it at one end to your board). Tie two half hitches around it with each working cord, moving across left to right. The result is a clean horizontal bar.
Diagonal DHH: Angle your filler cord 45 degrees. Tie the same knots along it. You get a diagonal line — the building block of every V-shape and diamond pattern you’ve ever seen in macrame.
Why it goes wrong: The filler cord must stay taut while you tie. If it’s loose, your line will curve unpredictably. Use one hand to hold the filler cord under tension while the other hand ties. Also, make sure you’re tying two complete half hitches per working cord — one half hitch alone will slip.
What you’ll use it for: Any geometric or patterned wall hanging, chevron designs, framing elements within a larger piece.
5. The Wrap Knot (Gathering Knot) — Difficulty: Beginner (10 minutes)
The wrap knot finishes projects. You’ll use it to gather multiple cords together at the top or bottom of a piece, hide messy cord ends, or create neat bundles for fringe.
How to tie it:
- Take one separate cord and fold it into a U-shape against the cords you want to gather.
- Wrap the long end of your U-cord tightly downward around the bundle, covering the tail of the U as you go.
- After 6–10 wraps, thread the working end through the loop at the bottom of the U.
- Pull the top tail of the U upward — this cinches the loop up into the wrapping, locking everything in place.
- Trim both ends close to the wrapping.
Why it goes wrong: Not wrapping tightly enough makes the whole knot slide. Each wrap should sit directly beside the previous one with no gaps. If the knot keeps slipping, add two more wraps before finishing.
What you’ll use it for: Finishing the top of plant hangers, creating neat cord bundles, and adding decorative sections anywhere in a piece.
The Honest Troubleshooting Section Other Guides Skip
Even when you know the steps, things go wrong. Here are the four issues beginners hit most — and their real fixes.
Problem: My square knots look twisted, not flat. You’re completing both halves in the same direction. The second half of a square knot is the mirror image of the first. Left-over-middle comes first, then right-over-middle second.
Problem: My work looks uneven — some knots are tight, some loose. Tension is the hardest thing to teach and the most important thing to practice. Try this: after every knot, hold the filler cords with one hand and push the completed knot upward with your thumbnail before moving on. This resets the tension uniformly.
Problem: I ran out of cord halfway through. You need to add new cord. Fold a new piece in half, place it behind the short working cord, and tie a lark’s head knot onto the short cord. Fold the short cord down alongside the filler cords and continue knotting over it. The joint disappears into the pattern.
Problem: My cords are fraying and impossible to work with. Wrap the cut ends of your cords with a small piece of tape before you start. Peel the tape off when you’re done. This is the single most-underused beginner tip in macrame — it makes handling individual cords ten times easier.
Which Knot Should You Practice First? (A Clear Learning Path)
Here’s the order that builds skills fastest, based on how each knot prepares you for the next:
| Week | Focus | Goal |
|---|---|---|
| Week 1 | Lark’s Head + Square Knot | Complete a simple keychain or 6-inch wall hanging |
| Week 2 | Half Hitch + Double Half Hitch | Add a diagonal line element to a small wall piece |
| Week 3 | Wrap Knot + all 5 combined | Finish a complete 12-inch wall hanging with fringe |
| Week 4 | Repeat square knots in alternating rows | Make a beginner plant hanger |
Don’t try to learn all five in a single sitting. Your hands need to build muscle memory. Thirty minutes of practice on one knot each day moves you faster than three hours of scattered practice across five knots.
Your First Complete Project: The 3-Knot Wall Hanging
Once you’re comfortable with the lark’s head, square knot, and double half hitch, you have everything you need for your first real piece. Here’s a simple structure that uses all three:
- Mount 8 cords (cut at 48 inches each) onto a 10-inch dowel using lark’s head knots. You’ll have 16 working strands.
- Tie two rows of square knots across all cords (groups of 4).
- Tie one row of alternating square knots (offset by two cords).
- Add two diagonal double half hitch lines forming a V-shape.
- Finish with a wrap knot at the bottom, then trim and brush out the fringe.
Total time: 45–90 minutes for your first attempt. Keep your expectations realistic — your tension won’t be perfect yet, and that’s fine. Macrame has natural variation built in.
What Comes After These 5 Knots
Once these feel automatic — and they will, faster than you think — three intermediate knots open up significantly more complex designs: the berry knot (a cluster of square knots pulled into a ball shape), the josephine knot (a decorative loop knot), and the Chinese crown knot (used in three-dimensional pieces and jewelry).
You don’t need those yet. Get the five basics working cleanly first.
The gap between “I’ve learned the steps” and “I can do this comfortably” is just repetition. Tie 20 square knots today. Then 20 more tomorrow. By the end of the week, you won’t be thinking about the steps at all — you’ll just be making things.
Ready to start? Cut four cords at 24 inches each, fold them over a pencil, and tie your first row of square knots right now. Everything else in macrame follows from that moment.