
Your First Macrame Wall Hanging Takes About 3 Hours and Costs Less Than $20. If you search Pinterest for macrame wall hangings, you will find thousands of gorgeous designs that look incredibly complicated. Here is what most of those posts do not tell you: the basic wall hanging you see everywhere uses only two knots, and you can learn both of them in under 10 minutes. The rest is just repetition and patience.
This tutorial walks you through making your very first macrame wall hanging from start to finish. You will learn which supplies to buy, which knots to master, and exactly how to create a simple but beautiful piece you can hang in your home the same day. No prior experience required, and no confusing terminology without explanation.
This Tutorial Is For You If…
You have seen macrame wall hangings in stores or on Instagram and thought they looked beautiful, but you assumed making one was too difficult or time consuming. Maybe you tried watching a YouTube tutorial and got lost when the instructor started using terms like “working cord” and “filler cord” without explaining what they meant.
This guide is written for someone who has never touched macrame cord before. If you can tie your shoes, you can do this. The project takes about three hours from start to finish, costs around $15 to $20 in materials, and creates a wall hanging that actually looks professional enough to gift or sell.
You do not need artistic talent. You need to follow instructions and be patient with yourself while learning two simple knots.
What You Need to Know Before Starting
Macrame is the art of knotting cord into patterns. Unlike knitting or crochet, you do not use needles or hooks. Your hands are the only tools. The cord itself creates the design through different knot combinations.
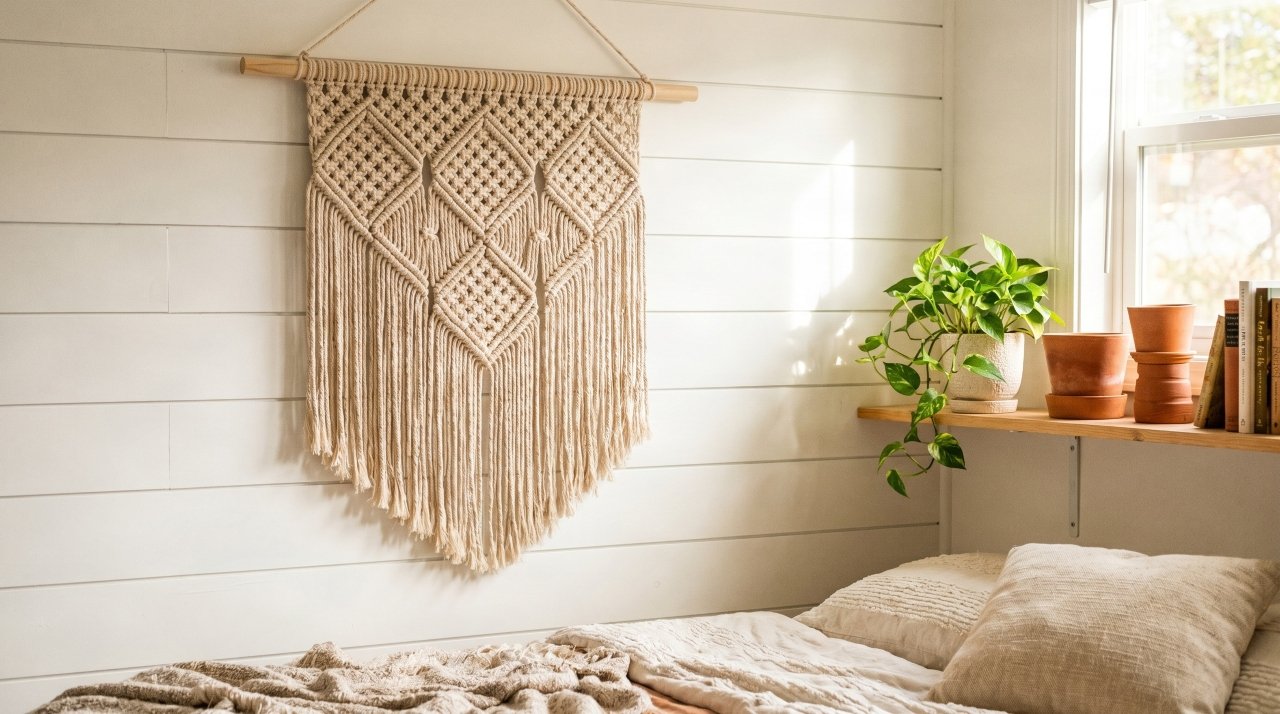
Most macrame wall hangings follow the same basic structure. You start with a wooden dowel or branch at the top. Cords hang down from that dowel. You tie those cords into patterns using a few basic knots. At the bottom, you leave the cord ends loose and fringed, or you tie them into additional patterns.
The two knots you absolutely must know for a beginner wall hanging are the lark’s head knot and the square knot. The lark’s head knot attaches your cord to the dowel. The square knot creates the actual pattern. Everything else is optional decoration.
Understanding cord types matters because it affects your final result. Cotton cord is the most popular choice for beginners. It comes in single twist (tighter, more defined knots) and 3-ply (softer, easier to work with, creates a fluffier fringe). For your first project, 3-ply cotton cord in 4mm or 5mm thickness works perfectly. You can find options for different types of macrame cord explained in detail through craft education sites.
The amount of cord you need depends on your finished size, but a good beginner rule is to cut each cord four times the length of your finished wall hanging. If you want an 18-inch wall hanging, cut cords that are 72 inches long. You will have leftover cord, but that is better than running short halfway through.
Supplies You Need (Total Cost: $15-$20)
Here is your complete shopping list with exact specifications:
Essential Supplies:
- 100 feet of 4mm or 5mm 3-ply cotton macrame cord (one spool covers this project with extra) – $12 to $15
- One wooden dowel, 12 to 18 inches long and about 1 inch diameter – $2 to $3
- Sharp scissors – you probably already own these
- Tape measure or ruler – you probably already own this
- Masking tape or clips to hold your work – $1 if you need to buy
Optional But Helpful:
- Comb or pet brush for fluffing fringe at the end
- S-hook or picture hanging kit for mounting
You can find all of these supplies at craft stores like Michaels or Joann, or order them from Amazon. The total cost runs between $15 and $20 for your first project, and you will have leftover cord for future projects.
Do not buy fancy metallic cord or synthetic materials for your first wall hanging. Plain natural cotton cord is easier to work with, more forgiving of mistakes, and creates the classic boho look most people want.
Making Your First Macrame Wall Hanging
Step 1: Cut and Prepare Your Cord
Measure and cut eight pieces of cord, each 72 inches long. This gives you enough length to create an 18-inch wall hanging with a nice fringe at the bottom.
Lay all eight cords next to each other and make sure they are exactly the same length. Uneven cords create a lopsided final product that looks sloppy. Take the extra 30 seconds to measure carefully now rather than trying to fix it later.
Tape one end of your wooden dowel to a table, door frame, or chair back. You need it stable and at a comfortable working height. Chest height works well for most people because you can see your knots clearly without hunching over.
Step 2: Attach Cords Using the Lark’s Head Knot
The lark’s head knot is how you attach cord to your dowel. Here is exactly how to do it:
Take one 72-inch cord and fold it exactly in half. Place the folded loop over the top of your dowel, with the loop pointing up and the two loose ends hanging down. Pull the two loose ends up and through the loop. Pull tight. The cord is now attached to your dowel.
Repeat this with all eight cords. Space them evenly across your dowel, leaving about half an inch between each attachment point. When finished, you should have 16 hanging strands (because each cord folded in half creates two strands).
This knot feels awkward the first time you do it. By the third cord, it becomes automatic. If your knot looks messy, untie it and try again. These knots set the foundation for everything else.
Step 3: Learn the Square Knot
The square knot creates the decorative pattern in your wall hanging. It uses four strands at a time: two outer working cords and two inner filler cords.
Here is how to tie one square knot:
Grab four adjacent hanging cords. The two outer cords (far left and far right) are your working cords. The two middle cords are your filler cords that stay still.
Take the left working cord and bring it over the two filler cords and under the right working cord. Take the right working cord and bring it under the filler cords and up through the loop created by the left cord. Pull tight. This completes the first half of the square knot.
Now reverse the process. Take the right working cord over the filler cords and under the left working cord. Take the left working cord under the filler cords and up through the loop created by the right cord. Pull tight. You just completed one full square knot.
If you need visual guidance, craft authority sites offer detailed square knot instructions with diagrams that help clarify the over-under pattern.
The square knot should look symmetrical when you pull it tight. If it twists or spirals, you reversed the over-under pattern incorrectly. Untie it and try again. Getting this knot right is the most important skill in this entire project.
Step 4: Create Your First Row of Square Knots
Starting from the left side of your dowel, tie square knots using every group of four cords. If you attached eight cords (creating 16 hanging strands), you will tie four square knots in this row.
Tie each knot about two inches below the dowel. Use a ruler to keep them level. Uneven rows look messy and amateur.
After completing this first row, step back and look at your work. All four knots should sit at the same height and look symmetrical. If one knot looks different, check whether you completed both halves of the square knot correctly.
Step 5: Create Your Second Row with Offset Pattern
This step creates the classic diamond or net pattern you see in most macrame wall hangings.
Leave the first two cords (far left) and the last two cords (far right) hanging loose. Starting with cords 3, 4, 5, and 6, tie a square knot two inches below your first row. Move to cords 7, 8, 9, and 10 and tie another square knot at the same height. Continue across.
This offset pattern, where you skip cords on alternating rows, creates the open diamond shapes that make macrame recognizable.
Step 6: Repeat Rows to Build Length
Continue alternating between full rows (using all cords in groups of four) and offset rows (leaving edge cords loose). Tie each row about two inches below the previous one.
After about five to seven rows, you will see the diamond pattern emerge clearly. Keep going until your knotted section measures about 12 inches long. This leaves 6 inches of loose cord at the bottom for fringe, which creates good visual balance.
Count your rows as you go and keep the spacing consistent. Inconsistent spacing is the number one thing that makes beginner macrame look beginner.
Step 7: Finish and Trim Your Fringe
Once your knotted section reaches your desired length, stop tying knots. Let all the cords hang loose below your last row.
Lay your wall hanging on a flat surface. Use sharp fabric scissors to trim all the bottom cords to the same length. Six inches of fringe works well for an 18-inch wall hanging, but you can go longer or shorter based on preference.
After trimming straight across, you can create a curved or V-shaped fringe by trimming the outer cords slightly shorter than the center cords. Cut slowly and step back frequently to check your work. You can always trim more, but you cannot add cord back.
For a fluffier, more textured fringe, gently brush out the bottom two inches of each cord strand using a pet brush or wide-toothed comb. This separates the plies and creates that signature boho fluffy look. If you want to see the technique visually, searching for how to trim and brush macrame fringe brings up helpful video demonstrations.
Step 8: Hang Your Finished Wall Hanging
Cut a piece of cord or use twine to tie to each end of your dowel, creating a loop for hanging. Make sure the loop is centered so your wall hanging hangs straight.
Use a nail, command hook, or picture hanger to mount it on your wall. Step back and admire what you just created from scratch in an afternoon.
What Most Tutorials Get Wrong About Teaching Beginners
Most macrame tutorials assume you already know basic fiber craft terminology or that you will figure things out through trial and error. They skip over the fact that cord length calculations confuse beginners, or that uneven knot tension creates warped patterns.
Here is what almost nobody tells you: your first wall hanging will probably look a little rough around the edges, and that is completely normal. The cords might twist slightly. The knots might not be perfectly uniform. The fringe might end up slightly uneven.
Make it anyway. Hang it on your wall anyway. You learn more from finishing an imperfect project than from abandoning it halfway through because it does not look like the Pinterest version.
Your second wall hanging will look noticeably better. Your fifth will look professional. But you only get there by actually completing that first one, imperfections and all.
What to Do Next After Finishing Your First Wall Hanging
Take a photo of your finished piece and save it. You will want to look back at it after you have made five or ten more and see how much your skills improved.
If you enjoyed this project, your next step is to learn a few more knot variations. The half square knot creates spiral patterns. The double half hitch knot creates diagonal or horizontal bars. Adding these to your skill set lets you create much more complex designs.
You can also experiment with different cord colors, mix in wooden beads, or try different dowel materials like copper pipe or driftwood branches. Each small change creates a completely different look.
If you want to turn this hobby into something more, consider making several wall hangings and listing them on Etsy or selling them at local craft markets. Handmade macrame wall hangings regularly sell for $40 to $80 depending on size and complexity. Your material cost stays around $15 to $20, which creates a decent profit margin for a few hours of enjoyable work.
You Just Made Something Beautiful With Your Own Hands
Learning how to make a macrame wall hanging for beginners comes down to mastering two simple knots and having the patience to repeat them in a pattern. You now know exactly which supplies to buy, how to attach cord to a dowel, and how to create the basic square knot pattern that forms the foundation of most macrame designs.
The wall hanging you made in this tutorial is not the fanciest design out there, but it is yours. You created it from scratch using skills you did not have three hours ago. That matters more than perfect knots or Instagram-worthy photos.
Now pick up that cord and make your second one. Try a different color. Make it bigger. Add beads. The only way to get better is to keep making.
What pattern are you going to try next? Leave a comment and let me know, or share a photo of your finished wall hanging so other beginners can see what is possible.