
Author: Callum Langham, Founder & Master Craft Creator at Gypsy Handmade
Most macramé DIY guides throw 20 projects at you with no sense of how long any of them actually take. You sit down on a Tuesday evening with a spool of cord and no idea if you’re about to make something in 20 minutes or accidentally start a three-day project.
That’s the problem this guide fixes.
Every project below is sorted by real time commitment — tested, not guessed. You’ll know exactly what you’re getting into before you cut a single strand. And if you’re wondering how much cord to buy before you start, our free Macramé Cord Length Calculator gives you an exact number in about ten seconds.
Quick Answer: Macramé DIY for Beginners
Macramé DIY is the craft of creating decorative textiles using knotting techniques rather than weaving or knitting. Beginners need only three materials: macramé cord (4mm 3-ply cotton is the most forgiving), a wooden dowel or ring, and scissors. The four core knots — Lark’s Head, Square Knot, Double Half Hitch, and Gathering Knot — cover roughly 90% of all beginner projects. A simple keychain takes 15 to 30 minutes. A standard wall hanging takes 2 to 4 hours. A plant hanger sits somewhere in between, usually under 90 minutes once you know the knots. Start with a keychain to get comfortable with tension before moving to larger projects.
What You Need Before You Start
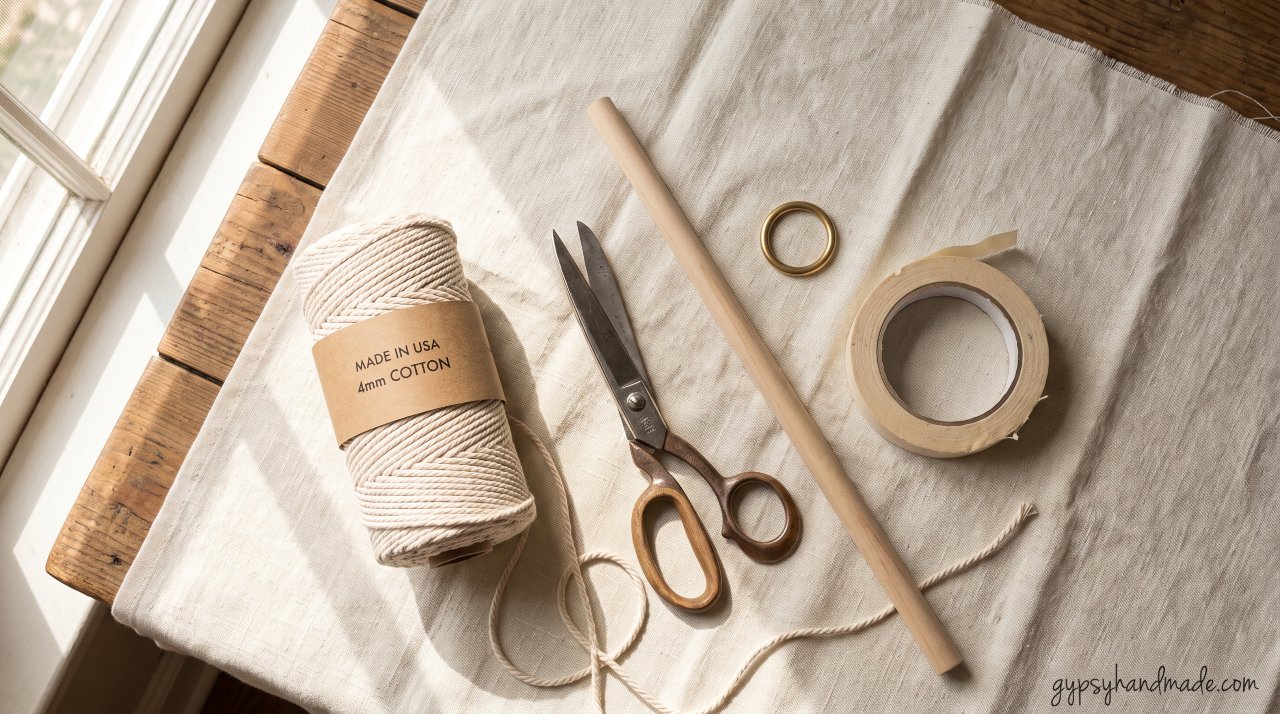
You don’t need much. Resist the urge to buy a full kit before you’ve made anything.
The short list:
- 4mm 3-ply cotton cord — soft, easy on your hands, and forgiving when you make mistakes. Single-strand cord gives a fluffier fringe but frays faster. If you want to compare cord types before buying, Ganxxet’s macramé cord guide clearly breaks down ply, twist, and braided options.
- Sharp scissors — fabric scissors only. Blunt scissors will fray cut ends immediately.
- A wooden dowel, metal ring, or sturdy branch — whatever you’re knotting onto.
- Masking tape — taping your cord ends stops fraying while you work.
That’s genuinely it for the first three projects on this list. Don’t buy a board, hooks, or special clips until you know you enjoy it.
7 Macramé DIY Projects, Sorted by Time
1. Macramé Keychain — 15 to 30 Minutes
Cord needed: approximately 4 x 60cm strands of 3mm or 4mm cotton cord Knots used: Lark’s Head, Square Knot, Gathering Knot Difficulty: Complete beginner
This is the one to start with. Always. The keychain is short enough that you reach the end before losing patience, and it teaches you the three knots you’ll use in every other project on this list. Most people make two or three in the same sitting once they get going.
Fold your cord in half and mount it onto a metal ring using Lark’s Head knots. Work square knots down the length, finish with a gathering knot, and trim the fringe. That’s the whole project.
The most common mistake here is pulling the square knots too tight. Your knots should sit flush and even — if they start twisting, you’re pulling too hard. Loosen up and the problem fixes itself.
Get the full step-by-step in our Macramé Keychain Tutorial.
2. Macramé Feather — 20 to 40 Minutes
Cord needed: approximately 30 x 25cm strands of 3mm cotton cord, plus one 30cm base strand Knots used: Lark’s Head only Difficulty: Complete beginner
This is the one project where you don’t need to learn square knots at all. You mount short strands onto a base cord using Lark’s Head knots, then brush the entire thing out with a stiff-bristled brush until the fibres separate into a feather shape. The shaping is done with scissors, not knots.
The result looks genuinely impressive for the time it takes. A cluster of three feathers in slightly different sizes makes a wall display that most people assume took hours.
Use 3mm single-strand cord for this one — it brushes out into a much fluffier, more realistic feather shape than 3-ply. Trim the edges at an angle after brushing, not before. Cutting first and brushing after will fray your clean edge.
Explore five different feather styles in our Macramé Feathers Tutorial.
3. Macramé Rainbow Wall Hanging — 45 to 75 Minutes
Cord needed: approximately 40 strands of 3mm cord cut to 30cm, plus dye or coloured cord Knots used: Lark’s Head, Gathering Knot Difficulty: Beginner
This one is almost entirely about the brushing and shaping, not knotting. You build a half-circle arch by mounting short strands in colour order onto a curved wire or bent twig, brushing each section out and trimming it to a rounded arch shape. The result looks like a watercolour rainbow in fibre form.
If you want colour without dyeing, look for pre-dyed cotton macramé cord in terracotta, blush, sage, and ivory — those four cover most rainbow variations without looking garish. Natural dyes using avocado pits and onion skins give the softest, most earthy results if you want to experiment.
The detail that separates a good rainbow from a flat one: vary the density. Pack the strands slightly tighter in the middle sections and looser at the outer edges. It creates a natural arc that holds its shape better.
See our full Macramé Rainbow Wall Hanging Guide for the exact arch dimensions.
4. Macramé Plant Hanger — 60 to 90 Minutes
Cord needed: use the Macramé Cord Calculator — select Plant Hanger preset for exact meters Knots used: Lark’s Head, Square Knot, Gathering Knot Difficulty: Beginner to intermediate
The plant hanger is what most people picture when they hear “macramé DIY.” It’s also the project where beginners most often run out of cord — because the strands fold over at the mount point, doubling your actual cord consumption. This is the folded Lark’s Head effect, and it catches almost everyone the first time.
A standard 8-strand plant hanger at 2.2m finished length needs roughly 40 to 50 meters of 4mm cord total. The free calculator above gives you the exact figure for your specific dimensions and knot complexity, which saves a wasted trip back to the craft store.
Work four groups of two strands each. Tie square knots in alternating rows down the length, leave a gap for the pot to sit in, and finish with a large gathering knot below the pot opening. The gap size is what determines pot size — measure your actual pot before you start, not after.
Our full Macramé Plant Hanger Guide covers hanging height, pot sizing, and the most common tension problems.
5. Macramé Coasters — Set of 4 in About 2 Hours
Cord needed: approximately 8 x 80cm strands per coaster of 5mm cord Knots used: Square Knot, alternating Square Knot grid Difficulty: Beginner
Coasters are underrated as a beginner project. They’re small enough to finish in one sitting, they teach you the alternating square knot pattern that shows up in almost every wall hanging, and you end up with something genuinely useful at the end.
Use 5mm cord for coasters — the thicker diameter creates tighter, more durable flat work. Thinner cord produces a floppy coaster that slides around under a mug.
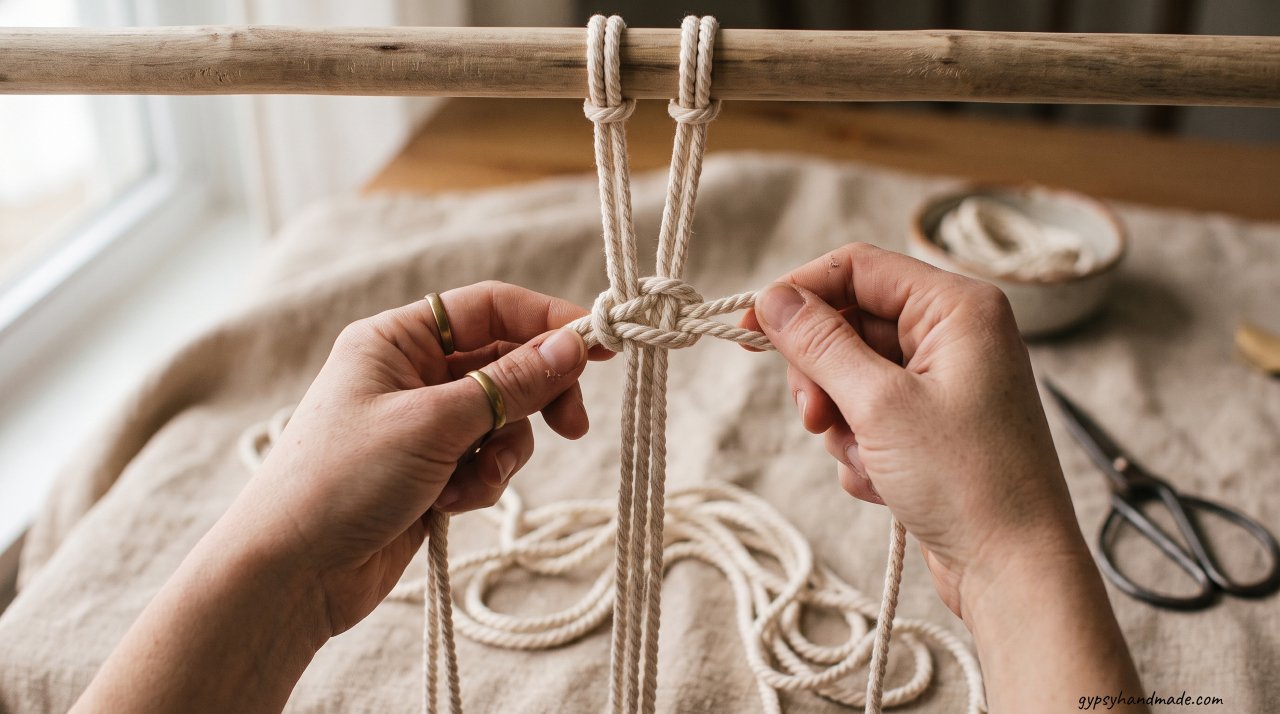
The technique is a flat square knot grid. Mount 8 strands onto a small ring or piece of tape, work alternating rows of square knots to fill a circle or square, then finish the edges with a simple overhand knot on each strand. Trim to a short fringe or tuck the ends under with a tapestry needle for a cleaner look.
6. Macramé Wall Hanging — 2 to 4 Hours
Cord needed: use the Macramé Cord Calculator — select Wall Hanging preset Knots used: Lark’s Head, Square Knot, Double Half Hitch, Gathering Knot Difficulty: Beginner to intermediate
This is the project most people work up to after a keychain and a plant hanger. It takes longer than the first five items on this list, but it’s also the one that ends up on a wall and stays there for years.
The real time variable is the fringe. Basic square knot patterns on a 40cm wide hanging take about 90 minutes to knot. The fringe trimming, brushing, and final shaping adds another 30 to 60 minutes depending on how detailed you want the bottom edge.
Start with a 40cm wooden dowel and 16 strands of 4mm cord. A symmetrical design (same pattern on both sides of centre) is the most beginner-friendly, because mistakes on one side are easy to spot and fix before you reach the fringe.
Our Macramé Wall Hanging for Beginners Guide walks through a full symmetrical design with knot counts at each row.
7. Macramé Curtain Panel — Weekend Project (6 to 10 Hours)
Cord needed: calculate per panel using the Macramé Cord Calculator — use Custom mode Knots used: Lark’s Head, Square Knot, Double Half Hitch, Spiral Knot Difficulty: Intermediate
This is the honest weekend project. A full curtain panel for a standard window (150cm x 120cm) involves mounting 60 to 80 strands and working a repeating pattern across all of them. The knotting itself isn’t complicated — it’s repetition of patterns you already know. The challenge is maintaining even tension across 80 strands over several hours.
The most practical approach: work in sessions of no more than 90 minutes. Your tension shifts when your hands get tired, and tired-hand tension creates visible bands across the design where the knot spacing changes.
Spiral knots (half square knots repeated in one direction) are the fastest curtain pattern and look genuinely good in boho and Scandi interiors. Full square knot grids take twice as long but create a denser, more opaque panel.
See our Macramé Curtain Guide for panel sizing, rod mounting options, and the three pattern types that work best at curtain scale.
Frequently Asked Questions
What cord is best for macramé DIY beginners?
Start with 4mm 3-ply cotton cord. It’s the most forgiving option: soft on your hands, easy to unpick when you make mistakes, and widely available. Single-strand cord gives a fluffier fringe when brushed but is harder to control at first. Avoid nylon or polyester cord for your first few projects — they slip out of knots and are harder to pull tight consistently.
How much macramé cord do I need for a beginner project?
It depends on the project, strand count, and knot complexity. As a rough guide: a keychain needs about 2 to 3 meters, a plant hanger needs 40 to 50 meters, and a wall hanging needs 50 to 80 meters. For an exact figure based on your specific project, use the free Macramé Cord Calculator — it calculates per-strand length and total cord in both meters and yards.
Can I learn macramé DIY without any experience?
Yes, and the keychain is the proof. The Lark’s Head knot and Square Knot can be learned in under ten minutes from a diagram. Most complete beginners produce a usable keychain on their first attempt. The skills transfer directly to every other project — the curtain on this list uses the same two knots as the keychain, just many more times.
What’s the most common macramé mistake for beginners?
Uneven tension. Beginners either pull too tight (knots bunch up and twist) or too loose (the pattern looks slack and shapeless). The fix is to anchor your work at eye level — hang it from a hook rather than laying it flat — so you can see the tension as you go. Working flat hides problems that only appear when you hold the piece up.
Is macramé DIY expensive to start?
Not if you start small. A 100m spool of 4mm cotton cord costs around $12 to $18 and covers two to three beginner projects. Add scissors (you likely have them) and a wooden dowel from a craft store ($2 to $4) and you’re under $25 for your first two projects. If you plan to sell your finished pieces, the Etsy Seller Handbook section on pricing handmade goods is a great resource for working out material costs. The cost per project drops significantly as you work through a spool.
Your First Cut Is the Hardest One
The truth about macramé DIY is that most people stall at the planning stage. They spend more time researching cord types than they do actually knotting.
Pick the keychain. Buy one spool of 4mm cord. Cut it, mount it, knot it. The first project will look imperfect and that’s fine — every maker’s first keychain looks a little lopsided. The second one won’t.
When you’re ready to scale up, the Macramé Cord Calculator removes the guesswork on how much to buy. Save this guide to Pinterest so you have a project list ready when you want to try something new.

