
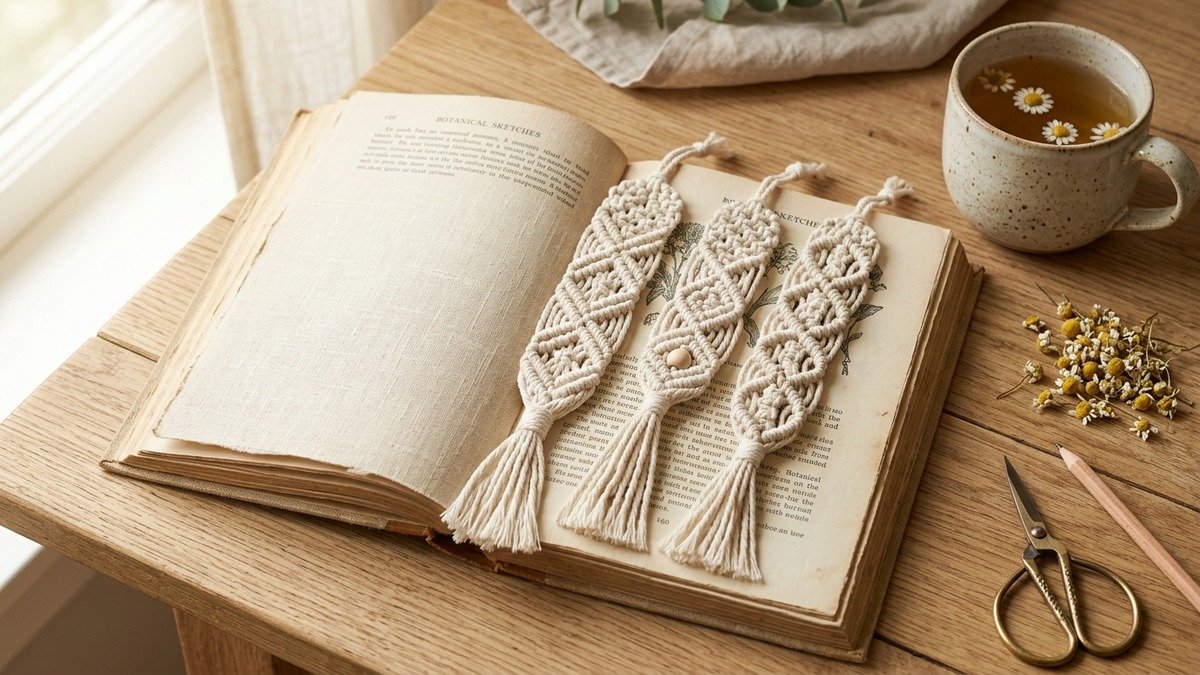
There is something deeply satisfying about tucking a handmade fiber marker between the crisp pages of your favorite book. A delicate macrame bookmark diy brings effortless bohemian warmth to your reading nook while giving you the perfect excuse to use up leftover cord scraps from larger wall hangings or plant hangers. Whether you are knotting a thoughtful gift for a fellow book lover or crafting a quick weekend project for yourself, this slender accessory combines practical function with tactile artisan beauty.
Unlike bulky store-bought bookmarks that stretch bindings or slip out of place, a hand-knotted cotton bookmark lies surprisingly flat between closed pages. When crafted with single-strand 2mm or 3mm cotton string, the woven diamond ridges nestle gently against paper without creasing delicate leaves. Finished with a soft combed tassel and an optional raw beechwood bead, each bookmark feels like a miniature work of textile art resting on your nightstand.
Best of all, you do not need complex equipment or hours of free time to finish this project. If you know how to tie a square knot and a diagonal double half hitch, you can finish an entire bookmark in roughly twenty to thirty minutes. Even if you are an absolute beginner picking up cord for the first time, our step-by-step instructions and cord diagrams will guide your hands through every loop. Let us gather our materials, set up our knotting board, and begin making your new favorite reading companion.
Quick Answer: How to Make a DIY Macrame Bookmark
To create an easy macrame bookmark diy, cut four lengths of 2mm or 3mm single-twist cotton cord to 150 cm (59 inches) each. Fold the cords in half and mount them to a cork board using T-pins or a binder clip, giving you eight working strands. Knot a top hanging loop or decorative chevron diamond pattern using alternating diagonal Double Half Hitch knots and central Square Knots until the knotted body reaches approximately 15 to 18 cm (6 to 7 inches) in length. Secure the base with a tight Gathering Knot or horizontal double half hitch bar, slide on a raw wooden bead if desired, and trim the fringe to 5 to 7 cm. Finally, comb the tassel fibers thoroughly with a metal fringe comb and apply a light mist of fabric stiffener or hairspray to keep the fringe silky and flat.
Key Project Takeaways
- ✓ Skill Level: Complete beginner. Master just two basic knots: the Square Knot and Diagonal Double Half Hitch.
- ✓ Total Time: 20 to 35 minutes per bookmark from first cut to finished fringe.
- ✓ Cord Requirement: Approximately 6 meters (20 feet) of cord in total, making it the ultimate scrap-buster project.
- ✓ Ideal Cord Type: 2mm or 3mm single strand (single-twist) cotton string for an ultra-flat profile that protects paper book leaves.
- ✓ Estimated Cost: Under $1.50 per piece using standard craft store cotton cord.
1. Essential Supplies and Cord Selection
Selecting the right cord diameter is the single most critical factor when planning a macrame bookmark. Many crafters make the mistake of grabbing 4mm or 5mm braided cord leftover from a wall hanging. While thick cord works wonders for structural home goods, it creates bulky lumps that stress book spines and leave permanent indentations on delicate paper.
For the cleanest results, choose 2mm or 3mm single strand cotton cord (often labeled single-twist string). Single-strand cord flattens naturally under tension, producing a supple ribbon-like band that slides smoothly between pages. Additionally, the untwisted fibers brush out effortlessly at the ends, producing that plush, feathery tassel finish characteristic of high-end bohemian stationery.
If you want to review fiber varieties before shopping, explore our detailed breakdown of the best macrame cord for beginners to compare cotton, linen, and synthetic alternatives. Natural unbleached cotton remains the top recommendation due to its soft tactile hand, gentle friction, and biodegradable plant origin.
Complete Supply Checklist
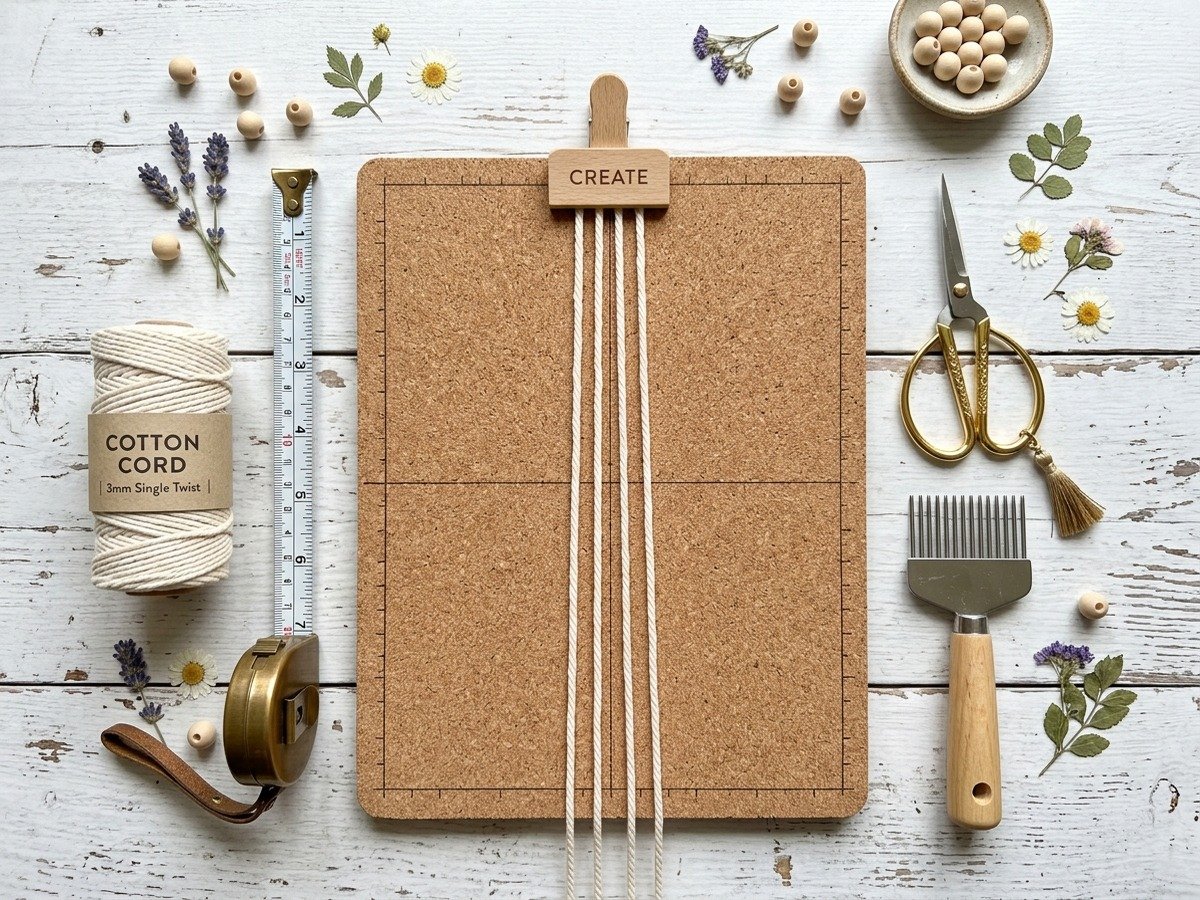
Here is the complete supply checklist you will need on your workbench:
- Cotton Cord: 6 meters (approx. 20 feet) of 2mm or 3mm single-twist unbleached natural cotton string.
- Knotting Board: A standard cork board, macrame project board, or firm foam block with grid markings.
- T-Pins or Glass-Head Quilting Pins: 4 to 8 sturdy pins to anchor your working loops and hold tension lines steady.
- Scissors: Sharp fabric shears or embroidery scissors for clean, non-fraying cuts.
- Fringe Comb: A fine-tooth metal pet slicker brush or barber comb to separate single-twist fibers.
- Tape Measure: Soft sewing tape or a craft ruler for measuring cut lengths.
- Wooden Accent Bead (Optional): One 10mm to 14mm natural unfinished geometric or round beechwood bead with a 3mm to 4mm hole.
- Light Stiffening Spray (Optional): A pump bottle of water-soluble fabric stiffener or regular aerosol hairspray to lock fringe fibers in place.
2. Cord Cut Lengths and Dimensions Guide
Because a bookmark is relatively compact, accurate cord lengths ensure you don’t waste precious fiber or run out of working strand before completing your final chevron diamond. In textile crafting, knotting reduces strand length by approximately three to four times the desired finished project length.
For a standard novel or journal bookmark measuring 16 cm (6.5 inches) of woven knotwork with a 6 cm (2.5 inch) fringe, cutting four cords at 150 cm (59 inches) each provides comfortable working room with minimal waste. When folded in half over your anchor pin, these four strands produce eight working cords of 75 cm each.
3. The Two Core Knots You Need to Know
You do not need an encyclopedia of knotting techniques to make an eye-catching bookmark. In fact, the timeless bohemian chevron design featured in our pattern relies on just two foundational knots: the Square Knot and the Diagonal Double Half Hitch.
If you need a refresher on finger positioning, check our comprehensive visual guide to macrame knots for beginners, where we break down hand angles, cord tension, and common beginner pitfalls. Here is a brief recap of how both knots function within this specific bookmark pattern:
The Square Knot (SK)
Formed with four adjacent strands. The outer two cords serve as working knotters while the center two cords act as stationary filler cores. You cross the left strand over the core in a “4” shape, drape the right strand over, bring it behind the core, and pull through the loop. Repeating this sequence in reverse creates a complete, balanced Square Knot that anchors the center of each diamond motif.
The Diagonal Double Half Hitch (DHH)
The secret to crisp diamond silhouettes. Designate one cord as the stationary “leader” (or guide cord) and hold it firmly at a 45-degree angle. Each adjacent working cord wraps around the leader twice, pulling upward and snug to form clean, raised diagonal ridges that frame your bookmark edges.
The historical origins of these knotting structures trace back centuries to Arab weavers and maritime sailors who developed decorative netting and trimming techniques, documented by educational repositories like the Smithsonian Institution. When applied to compact modern cotton goods, these time-tested knots yield remarkably durable items that withstand years of handling.
4. Step-by-Step Macrame Bookmark Tutorial
Follow these detailed steps to knot your bookmark from beginning to end. Set up your cork board at a comfortable table with good overhead lighting so your fingers can easily track strand numbering.
Step 1: Set Up and Pin Your Anchor Loop
Take your four pre-cut 150 cm cords and find their exact midpoints by folding them in half. You have two options for the top crown: tie an overhand loop knot to create a petite hanging loop that peeks out above your book, or pin the four folded center points directly to your cork board side by side using sturdy T-pins. Number your eight downward-hanging strands mentally from left to right as 1 through 8.
Step 2: Create the Top Opening Diamond (Left Slant)
Locate strand 4 and strand 5 in the center. Strand 4 will be your left leader cord. Hold strand 4 diagonally down toward the left edge at a 45-degree angle. With strand 3, tie a Double Half Hitch knot over strand 4. Repeat with strand 2, and then with strand 1. You have now established the upper-left ridge of your first diamond.
Step 3: Create the Top Opening Diamond (Right Slant)
Return to the center and use strand 5 as your right leader cord. Hold strand 5 diagonally down toward the right edge at a 45-degree angle. With strand 6, tie a Double Half Hitch knot over strand 5. Repeat this knotting with strand 7, and finally with strand 8. Both upper arms of the diamond are now open, pointing outward toward the edges of your board.
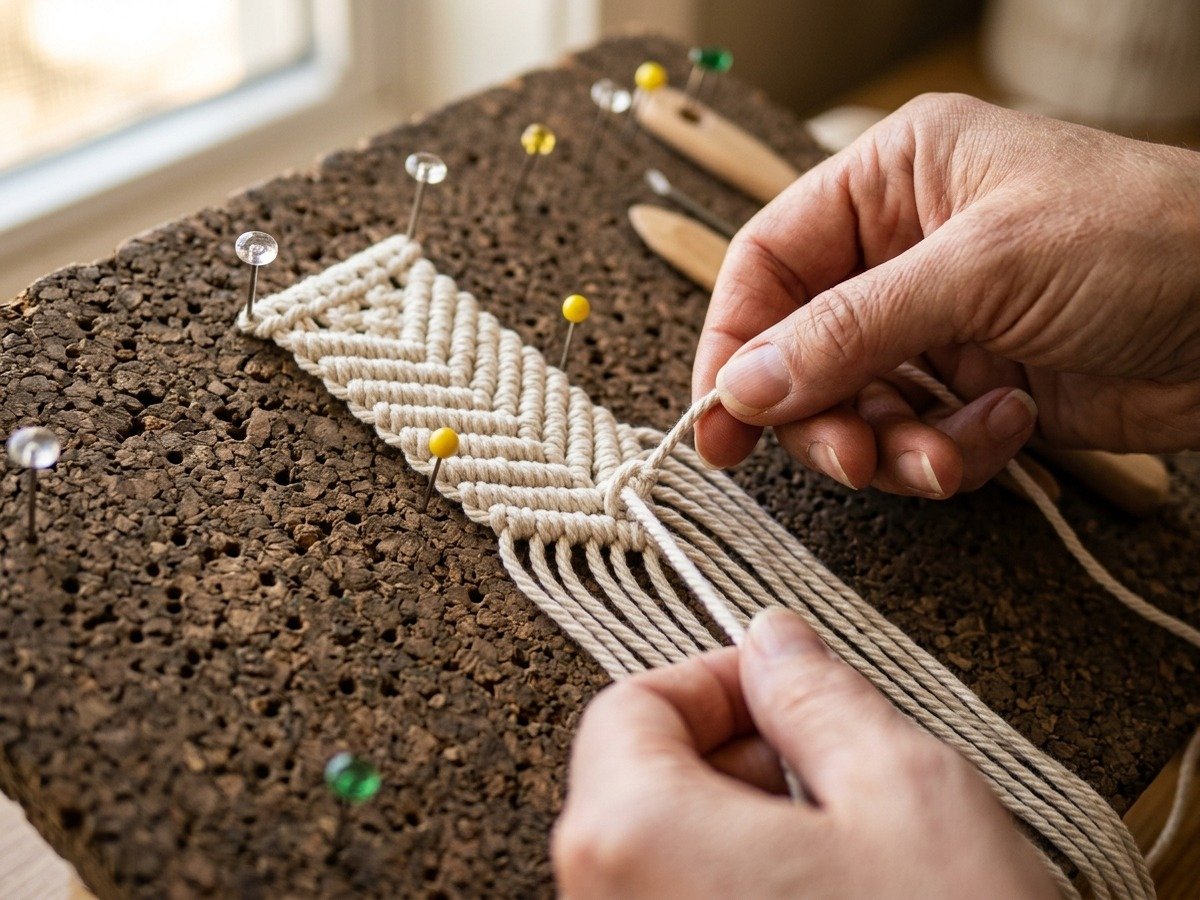
Step 4: Knot the Center Square Knot Heart
Look at the four center cords inside your open diamond (strands 3, 4, 5, and 6). Using strands 3 and 6 as working knotters over center strands 4 and 5, tie one snug Square Knot. This knot nestles directly inside the diamond pocket, creating a structural anchor that prevents the diamond ridges from pulling out of alignment.
Step 5: Close the Diamond Ridges
To seal the diamond, take the outermost left strand (strand 1) and angle it diagonally downward toward the center. Tie Double Half Hitch knots over it using strands 2, 3, and 4. Next, take the outermost right strand (strand 8) and angle it downward toward the center, tying Double Half Hitch knots over it using strands 7, 6, and 5. Finally, tie the two center leader cords together with one final Double Half Hitch to close the bottom apex of the diamond.
Step 6: Repeat the Pattern to Desired Length
Repeat Steps 2 through 5 consecutively. Most paperback novels benefit from four to five complete diamonds, totaling about 15 to 17 cm (6 to 7 inches) of knotted length. If you are crafting a marker for an oversized hardcover volume or an art journal, you can easily knot six or seven diamonds for additional reach.
Step 7: Finish with a Tight Bar or Gathering Knot
Once you close your final diamond, securely lock the cords so the knotwork won’t unravel in your bag. You can tie a clean horizontal row of Double Half Hitch knots straight across all eight strands, or use a 30 cm scrap piece of cord to wrap a traditional Gathering Knot around the entire bundle, pulling the hidden loop firmly inside before trimming the tag ends.
5. Perfecting the Combed Fringe and Tassel
The hallmark of an aesthetic bohemian bookmark is that silky, perfectly feathered fringe extending from the base. Achieving that salon-smooth finish takes deliberate technique, not a quick pass with a standard plastic comb.
First, trim your dangling tail cords straight across with sharp fabric shears, leaving about 6 to 8 cm. Place the bookmark flat on your cutting mat. Starting at the very bottom tips of the cords, gently tease the single-strand fibers apart using a fine metal pet slicker brush or a barber comb. Working from tips to base prevents knotting and keeps the delicate fibers from snapping.
Once fully separated and fluffed, smooth the fringe downward with your fingertips. Place a heavy ruler or piece of masking tape over the fibers and make one decisive, razor-straight cut with your shears. If you love the look of textured fiber accents, you can explore similar feather-trimming methods in our tutorial on how to make macrame leaves that stay stiff and flat.
To keep your fringe from curling into messy ringlets after being tucked inside a closed book, apply a light mist of water-based fabric stiffener or medium-hold aerosol hairspray from 30 cm away. Press the damp fringe between two sheets of parchment paper under a heavy book for two hours. The fibers will dry completely flat, soft to the touch, and resistant to humidity. Studies on natural cellulose fibers from agricultural programs like Penn State Extension highlight how controlled moisture and pressing temporarily reset hydrogen bonds in cotton, locking flat alignment without compromising fiber strength.
6. Three Creative Pattern Variations to Try
Once you have mastered the classic diamond motif, you can customize your macrame bookmark with subtle decorative twists that reflect your personal aesthetic. Here are three popular variations:
Variation A: Raw Wooden Bead Accent
Instead of knotting a center Square Knot inside your diamond, thread the two center filler cords through a 10mm or 12mm natural beechwood bead. Close your diamond ridges beneath the bead as usual. The raw timber texture contrasts beautifully with creamy cotton cord, creating a sculptural focal point reminiscent of our macrame mirror DIY wall decor.
Variation B: Two-Tone Earth Palette
Combine two cords of natural unbleached ivory with two cords of warm terracotta, sage green, or mustard gold. When mounting your four cords, alternate the colors across your board. As you knot your diagonal ridges, the colored strands will weave in and out of the ivory core, creating a striking Scandinavian geometric contrast.
Variation C: Continuous Chevron Braid
If you prefer a sleek, directional look without diamond pockets, knot continuous downward chevrons (arrowheads). Simply bring the outer cords to the center row after row using Double Half Hitch knots without opening diamond walls. This produces a dense, ultra-flat braided ribbon that slips into slim journals with zero resistance. Pair this with our favorite table decor designs, like how to make macrame coasters, for a coordinated artisan desk set.
7. Bookmark Care, Spot Cleaning, and Book Safety
Because bookmarks travel in backpacks, tote bags, and nightstand stacks, they inevitably pick up dust or coffee smudges over time. Caring for raw cotton knotwork is straightforward as long as you avoid harsh mechanical agitation.
Never toss your macrame bookmark into a washing machine or tumble dryer, as the turbulent cycle will unravel your combed fringe into an unfixable bird’s nest. Instead, spot-clean smudges with a damp microfiber cloth and a drop of gentle, unscented liquid castile soap. Press the cleaned area between a folded dry towel to absorb moisture, re-comb the fringe with your slicker brush, and allow it to air-dry completely flat.
To protect antique paper or fragile vintage bindings, avoid heavily dyed cords that haven’t been color-fasted. Textile research published by organizations like the Textile Society of America emphasizes that unbleached natural plant fibers prevent acidic chemical transfer to delicate paper materials. Choosing unbleached natural cotton helps keep your favorite books pristine for generations of readers.
Frequently Asked Questions
Will a macrame bookmark damage or stretch book spines?
No, as long as you use 2mm or 3mm single-strand cotton cord and maintain firm, even tension. Single-strand cord flattens naturally between closed book pages, distributing pressure evenly across paper leaves without straining the spine binding.
What is the best cord diameter for a DIY bookmark?
A 2mm or 3mm single-strand unbleached cotton string is the gold standard. It creates a bookmark approximately 2.5 to 3.5 cm wide with a flat profile that slides comfortably into pocket paperbacks and large hardcover volumes alike.
How long should a finished macrame bookmark be?
The ideal knotted body length is 15 to 18 cm (6 to 7 inches), paired with a 5 to 7 cm (2 to 3 inches) combed fringe. This total length of roughly 20 to 25 cm allows the knotted body to sit squarely on the page while the tassel and top loop extend past the book edges.
How do I keep the macrame bookmark fringe from curling?
Gently comb the fringe using a fine-tooth wire slicker brush, lightly mist with fabric stiffening spray or hairspray, and press between two sheets of baking parchment under a stack of heavy hardcovers for two hours until completely dry.
Can I use leftover scrap cord from other macrame projects?
Yes, bookmarks are one of the most effective scrap-busting projects in fiber art. You only need four pieces of 150 cm (59 inches) cord, making it easy to repurpose excess lengths trimmed from plant hangers or large wall hangings.
Creating your own macrame bookmark diy is one of the most rewarding quick crafts you can undertake. In under half an hour, a handful of cotton scraps transforms into a functional, heirloom-quality piece that makes every reading session feel a little more intentional. Pin your cords to your board, take your time setting your diamond angles, and enjoy the calming rhythm of knotting.

