

Walking through your home during the holidays should feel like stepping into a peaceful winter lodge. While big-box retailers fill their shelves with mass-produced glitter and brittle plastic baubles, nothing compares to the quiet organic beauty of handmade timber decor. Handcrafted wooden accents bring real soul, tactile texture, and grounding warmth to your living room mantel, dining buffet, and holiday tree.
If you have a collection of 2×4 offcuts in your garage, pruned birch branches from your yard, or leftover cedar shingles from a summer repair, you already have the building blocks for an elevated Scandinavian winter home. Crafting your own wooden holiday pieces saves significant money while allowing you to tailor sizes, stains, and finishes to your exact interior palette.
Quick Summary: How to Make DIY Wood Christmas Decorations
Timber Selection: Use untreated softwoods like pine or spruce for easy hand-saw cuts, or pruned birch and fallen cedar branches for organic woodland textures.
Branch Sterilization: Bake fresh-cut wood rounds in an oven at 200°F (93°C) for 60 to 90 minutes to eliminate hidden moisture, pest larvae, and sap stickiness before crafting.
Natural Finishing: Avoid polyurethane coatings that yellow over time. Seal raw wood with a homemade paste of mineral oil and beeswax to enrich natural grain patterns while preserving raw Scandinavian character.
Whether you are an absolute beginner equipped with only a hand pull saw and a piece of sandpaper, or a seasoned crafter looking to expand your handmade holiday collection, these fifteen inspiring projects will fill your home with artisan charm. Before jumping into the gallery, let us look at the fundamental tools and workshop preparation that ensure your timber pieces last for decades.

Essential Tools and Sustainable Timber Sourcing
You do not need a garage packed with thousand-dollar table saws or computerized routing tables to create stunning wooden holiday decor. In fact, simpler manual hand tools often grant you far greater tactile control and softer organic edges that factory equipment cannot replicate.
A Japanese Ryoba pull saw is our favorite cutting tool for holiday projects. Because it cuts on the pull stroke rather than the push stroke, the ultra-thin blade requires minimal effort and leaves a remarkably smooth crosscut surface that barely needs sanding. Pair this with a standard cordless drill, a basic set of brad-point drill bits, a 1.5-inch Forstner bit for tea light recesses, and a hand sanding block.
When gathering lumber, prioritize sustainable reclamation over purchasing expensive exotic hardwoods. Discarded shipping pallets made of heat-treated pine (look for the stamp marked HT) provide gorgeous weathered patinas at zero cost. Pruned garden limbs from birch, apple, or hazel trees yield authentic forest rounds with intact bark collars. For additional ideas on using everyday household offcuts for craft projects, explore our guide on craft ideas that actually look aesthetic.
Before cutting into found branches or reclaimed construction timber, consult the comprehensive Purdue University Extension timber drying and storage guidelines to ensure your wood has reached a stable equilibrium moisture content before assembly. Building with wet timber causes warping, shrinking joint seams, and split wood rounds once brought into heated indoor winter air.
Maker Safety Check: Never Cut Treated Pallet Wood
Always check the burning stamp on shipping pallet wood. Only use timber stamped with HT (Heat Treated). Never cut or sand timber stamped with MB (Methyl Bromide), which contains toxic chemical pesticides unsuitable for indoor home decor.

The 15 Best DIY Wood Christmas Decorations to Craft This Season
Here is our curated gallery of fifteen rustic, charming, and accessible wooden projects. Each concept balances minimal supply costs with maximum aesthetic impact, fitting effortlessly into modern farmhouse, Scandinavian, or bohemian interior styles.
| Project Idea | Primary Material | Skill Level | Estimated Time | Estimated Cost |
|---|---|---|---|---|
| 1. Geometric Scrap Wood Trees | Pine 2×4 Offcuts | Beginner | 45 Minutes | $2 – $5 |
| 2. Birch Log Candle Holders | Birch Tree Limbs | Beginner | 30 Minutes | Free – $4 |
| 3. Wood Slice Snowflake Ornaments | Birch Branch Rounds | Beginner | 1 Hour | $3 – $8 |
| 4. Wood Bead & Tassel Garlands | Unfinished Wood Beads | Beginner | 40 Minutes | $6 – $12 |
| 5. Nordic Village Cottages | Hardwood Scraps | Intermediate | 1.5 Hours | $4 – $10 |
| 6. Pallet Wood Star Plaque | Reclaimed Pallets | Intermediate | 2 Hours | Free – $5 |
| 7. Dowel Rod Tiered Wall Tree | Birch Dowels & Twine | Beginner | 45 Minutes | $8 – $14 |
| 8. Pyrography Wooden Spoons | Beechwood Spoons | Beginner | 30 Minutes | $5 – $9 |
| 9. Branch Slice Snowmen | Graduated Branch Rounds | Beginner | 40 Minutes | Free – $3 |
| 10. Cedar Shingle Lanterns | Cedar Shingles | Intermediate | 1.5 Hours | $7 – $15 |
| 11. Wood Stamped Advent Blocks | Square Timber Offcuts | Beginner | 1 Hour | $4 – $8 |
| 12. Twig & Pine Cone Sleds | Craft Sticks & Fallen Twigs | Beginner | 30 Minutes | $2 – $5 |
| 13. Herringbone Table Runner | Thin Lath Wood Strips | Advanced | 3 Hours | $12 – $20 |
| 14. Driftwood Tree Topper Star | Weathered Driftwood Sticks | Beginner | 45 Minutes | Free – $5 |
| 15. Chunky 4×4 Lumber Gnomes | 4×4 Post Remnants | Beginner | 1 Hour | $5 – $10 |
1. Geometric Scrap Wood Trees
Geometric scrap wood trees are the quintessential Scandinavian holiday accent. By cutting simple triangular profiles from varying thicknesses of 2×4 and 1×3 lumber remnants, you produce a miniature evergreen grove with clean architectural lines. Rather than painting them in glossy artificial green, leave the raw wood grain exposed and finish them with a light coating of natural wax. Grouping three or five trees of alternating heights creates an immediate designer silhouette across an entryway credenza or dining sideboard.
2. Rustic Birch Log Candle Holders
Few woodland textures say winter quite like the chalky white bark of paper birch. When storm-damaged branches fall in autumn, collect limbs measuring 3 to 4 inches in diameter. Cut the logs into graduated lengths of four, six, and eight inches. Using a 1.5-inch Forstner drill bit, bore a 0.75-inch recess into the top center of each log to snugly cradle standard tea light candles or flame-free LED votives. For safety and timber preservation standards, follow the USDA Forest Service responsible firewood and timber handling guides when foraging fallen timber from public woodlands.
3. Wood Slice Botanical Snowflake Ornaments
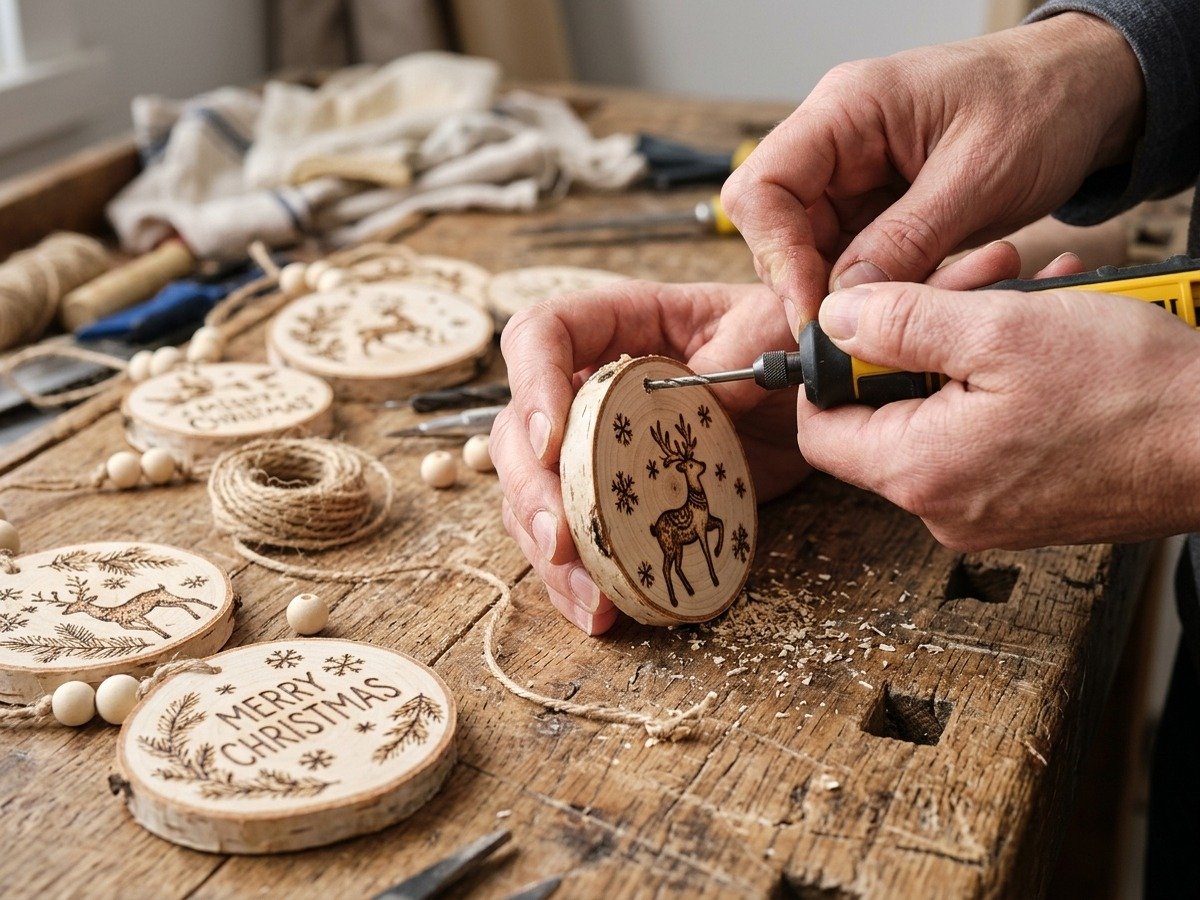
Crosscut branch rounds become delicate heirloom ornaments with a touch of pyrography or white acrylic line art. Look for dry birch or pine branches with intact bark rims. Slicing rounds 3/8-inch thick yields lightweight discs that will not weigh down tree boughs. Once drilled with a hanging hole, trace botanical pine needles, Scandinavian starbursts, or simple snowflake lattices. These make exquisite packaging toppers for holiday presents. If you are preparing gift packages this season, pair them with concepts from our roundup of handmade gift ideas to make in one evening.
4. Raw Wooden Bead and Jute Tassel Garlands
Bead garlands are the great unifier of holiday decorating. Strung across fresh pine boughs on a mantel or woven around a Christmas tree, natural wooden beads provide rhythm, texture, and light reflection. Combine alternating diameters of 16mm, 20mm, and 25mm raw beechwood beads on thick natural jute twine. Finish each tail with a handmade five-inch jute tassel. For an elevated twist, dip-dye the bottom inch of each tassel in diluted black walnut stain or forest green fabric dye.
5. Nordic Scrap Wood Village Cottages
Turn chunky hardwood offcuts into a timeless holiday village. Cut simple 45-degree rooflines on small rectangular blocks of maple, walnut, or pine. Instead of detailed painting, embrace minimalism by drilling tiny 1/8-inch holes to represent glowing attic windows, or use a fine chisel to carve a single vertical door seam. Staggered across a windowsill with micro fairy lights tucked behind them, these little houses evoke cozy alpine hamlets.
6. Reclaimed Pallet Wood Star Wall Plaque
Five mitered pieces of weathered pallet lath assemble into an impressive five-point star for your front porch or above the fireplace. Sand the rough face just enough to remove loose splinters while leaving saw marks and natural weather graying intact. Fasten the overlapping joints from behind with 3/4-inch wood screws and waterproof carpenter glue. Wrap warm white wire fairy lights loosely around the timber perimeter for evening drama.
7. Dowel Rod Tiered Tree Wall Hanging
If you live in an apartment or need holiday decor that takes zero floor space, a tiered dowel tree is an ingenious solution. Cut five birch dowels in graduated lengths: 6 inches, 12 inches, 18 inches, 24 inches, and 30 inches. Connect them vertically with natural cotton macrame cord spaced 5 inches apart, forming a triangular tree silhouette that hangs flush against your wall. Drape delicate greenery sprigs and clip miniature ornaments along each horizontal tier. For matching fiber accents, check out our tutorial on crafting a macrame Christmas tree.
8. Pyrography Wooden Spoon Gift Tags
Inexpensive beechwood coffee scoops and mini spoons can be transformed into heirloom holiday tags using a standard wood burning tool. Burn handwritten family names, festive winter herbs, or simple pine sprigs onto the bowl of each spoon. Tie them to cookie tins, homemade sourdough loaves, or gourmet gift baskets with red baker twine. After the holidays, the recipient keeps a functional kitchen keepsake.
9. Sliced Branch Snowman Figurines
Stacking three graduated branch slices produces charming freestanding snowmen with authentic woodland character. Select limbs of 1.5, 2, and 2.5 inches in diameter. Cut flat contact faces on each round, then join them with interior wood dowels and carpenter adhesive. Add a tiny torn strip of red plaid flannel fabric for a winter scarf, and finish with a painted wooden nose or a tiny cedar twig hat.
10. Cedar Shingle Festive Lantern Boxes
Aromatic cedar shingles have a subtle natural taper that lends itself beautifully to slatted wooden lanterns. Cut four identical square panels, bore decorative circular vent holes in each face, and join them into an open-top box with small brass brads. Place a battery-operated LED pillar candle inside. As the candle warms the timber, the cedar releases a gentle, nostalgic forest fragrance throughout your living room.
11. Wooden Block Stamped Advent Blocks
Count down the days until Christmas with tactile numbered cubes made from 2×2 lumber offcuts. Cut four clean two-inch cubes, sand all corners smoothly to create softened pillow edges, and hand-stamp numbers 0 through 9 across the facets using dark sepia ink. Housed inside a shallow timber tray on your coffee table, rearranging the blocks each morning becomes a delightful daily ritual for the entire family.
12. Miniature Pine Cone and Twig Sled Ornaments
Reminiscent of old-fashioned toboggans, these miniature ornaments are crafted from popsicle sticks, slender dried birch twigs, and tiny alder cones. Glue curved twig runners beneath a slatted craft stick deck, wrap a micro twine towrope around the front crossbar, and dust the deck lightly with white chalk paint to mimic fresh powder snow. They look timeless nestled into real pine boughs alongside nostalgic Christmas Perler bead patterns.
13. Herringbone Scrap Wood Table Runner
For makers with a miter box and a collection of uniform wood lath or molding scraps, a flexible wooden table runner is an unforgettable holiday centerpiece. Cut forty thin timber pieces at 45-degree angles, then adhere them in a classic herringbone layout onto a flexible heavy-duty canvas backing using industrial flexible fabric glue. The completed runner rolls up compactly for post-holiday storage while protecting your tabletop from hot serving platters.
14. Driftwood Tree Topper Star
Crowing your evergreen with a star made from smooth ocean or river driftwood brings an organic coastal element to winter styling. Select five straight, weathered sticks roughly ten inches in length. Fasten the intersecting points with dabbed hot glue, then bind each intersection tightly with raw linen cord or fine hemp twine. Attach a split dowel collar to the reverse side to slip firmly over the central tree spire.
15. Chunky 4×4 Lumber Holiday Gnomes
Substantial 4×4 post offcuts make adorable freestanding Scandinavian tomte gnomes. Cut a steep angled point on one end to form a whimsical peaked hat, paint the hat in muted terracotta or sage green chalk paint, and glue a triangular piece of cream faux fur beard just below the hat brim. Add a smooth wooden bead for the protruding round nose. These sturdy figures look wonderful guarding your fireplace hearth or front porch steps. If you enjoy making holiday items that sell well at seasonal craft fairs, see our detailed guide on easy crafts to make and sell.
Reusing scrap timber also keeps usable building materials out of municipal landfills. According to the US Environmental Protection Agency recycling and waste reduction directives, repurposing discarded lumber and yard wood waste significantly minimizes household carbon footprints while conserving valuable forest resources.
Step-by-Step Tutorial: Making Scrap Wood Mountain Trees
To help you get started immediately, let us walk through the exact cutting, sanding, and assembly process for our most popular project: geometric scrap wood trees. You can make an entire grove of three trees in under an hour using basic pine 2×4 offcuts.
Materials and Cut List
Gather one 3-foot length of scrap pine 2×4 (actual dimensions 1.5 inches by 3.5 inches), one 12-inch scrap of 1×2 pine for tree bases, 120-grit and 220-grit sandpaper, PVA carpenter wood glue, and natural wood conditioner paste.
A (Tall): 10 inches tall, 20-degree miter cut tapering to a sharp peak.
B (Medium): 7.5 inches tall, 25-degree miter cut tapering to a peak.
C (Small): 5.5 inches tall, 30-degree miter cut tapering to a peak.
Step 1: Marking and Cutting the Angles
Measure and mark the center line on the top end of your 2×4 timber piece. Using a speed square or protractor, draw angled cut lines from the top center point down to the outer edges at the desired height. Clamp the timber firmly to your workbench. Using your Japanese pull saw, follow the marked angle line steadily. Pull saws cut best with gentle, even strokes rather than forceful pushing. Once one side is severed, flip the piece and repeat on the opposite side to release your clean triangular tree blank.
Step 2: Sanding and Softening Edges
Raw saw cuts often display minor tear-out or tooth marks. Wrap a sheet of 120-grit sandpaper around a rigid sanding block. Sand each face firmly in the direction of the wood grain until all cut marks vanish. Switch to 220-grit paper to polish the timber until it feels silky smooth. Take an extra moment to gently knock down the sharp outer edges at a 45-degree angle. This micro-bevel adds a refined, tactile quality that distinguishes hand-crafted work from mass production.
Step 3: Attaching the Trunk Base
While 2×4 cutouts can stand upright independently, mounting them on a contrasting base gives them added stability and presence. Cut small 1×2 pine pieces into 3-inch lengths. Apply a thin, even bead of PVA wood glue to the bottom center of the tree triangle. Center the base beneath the tree and press firmly for thirty seconds. Wipe away any glue squeeze-out with a damp cotton rag before it cures, as dried glue blocks stain and wax penetration.

Wood Slice Preparation: The Oven Drying and Sterilizing Method
One of the most frequent mistakes crafters make when crafting with fresh tree branches is slicing them and immediately applying paint, vinyl, or wood-burned designs. Fresh wood holds substantial sap moisture. As the wood slowly air-dries over subsequent weeks, the outer perimeter shrinks faster than the dense core, resulting in unsightly radial splits that ruin your artwork.
To cure and stabilize wood rounds safely at home, use this gentle oven-drying protocol:
- Cut Uniform Slices: Slice branch rounds to an even thickness of 3/8 inch to 1/2 inch using a sharp miter saw or Japanese pull saw. Consistent thickness ensures uniform heat penetration.
- Arrange on Wire Racks: Place your wood slices on metal baking cooling racks positioned inside large baking sheets. Elevated racks allow heated air to circulate freely beneath each slice, preventing uneven warping.
- Low and Slow Baking: Preheat your kitchen oven to 200°F (93°C). Never exceed 225°F, as excessive heat chars the delicate bark ring and boils residual sap, causing sudden explosions or deep cracking.
- Bake for 60 to 90 Minutes: Bake for approximately one hour for small 2-inch slices, or up to 90 minutes for thicker 4-inch rounds. Flip each round halfway through the drying cycle.
- Cool Slowly: Turn off the oven and leave the door slightly cracked, allowing the wood rounds to cool gradually to room temperature over 45 minutes before handling.
This simple thermal process evaporates excess water weight, crystallizes sticky pine sap into an inert resin, and eliminates any lurking microscopic insect larvae. Your finished slices emerge perfectly dry, flat, and ready for crafting.
Finishing and Sealing Without Yellowing
Many crafters reach for standard polyurethane or varnish to seal their holiday timber crafts, only to be disappointed when light-colored pine or birch turns an artificial brassy yellow. Synthetic clear coats also create a glassy sheen that robs rustic wood of its organic tactile appeal.
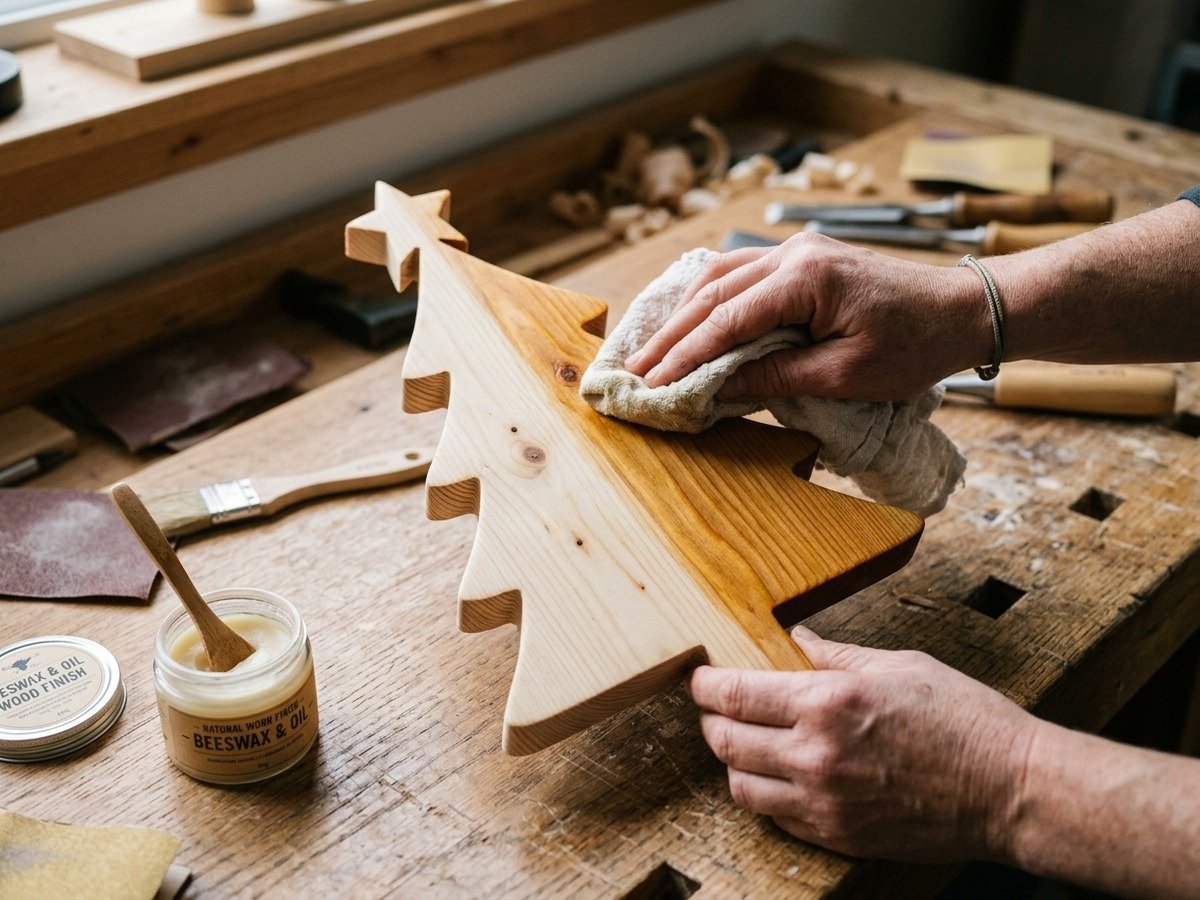
To preserve the luminous, raw Scandinavian feel of fresh timber, we recommend an all-natural beeswax and food-grade mineral oil paste. This non-toxic conditioner enriches subtle growth ring contrasts, imparts a luxurious satin luster, and smells wonderfully wholesome.
Callum’s Natural Wood Butter Recipe
Melt 1 part natural yellow beeswax pellets with 4 parts food-grade mineral oil in a double boiler over gentle heat. Pour into a shallow glass mason jar and let cool into a smooth, creamy paste.
Scoop a nickel-sized dollop onto a clean lint-free cotton cloth. Rub thoroughly into the sanded wood in circular motions. Allow the oil to absorb for twenty minutes, then vigorously buff the surface with a dry cloth. The friction generates mild surface heat that burnishes the beeswax into a water-resistant, soft-touch protective seal.
Styling Your Handmade Wooden Decor for the Holidays
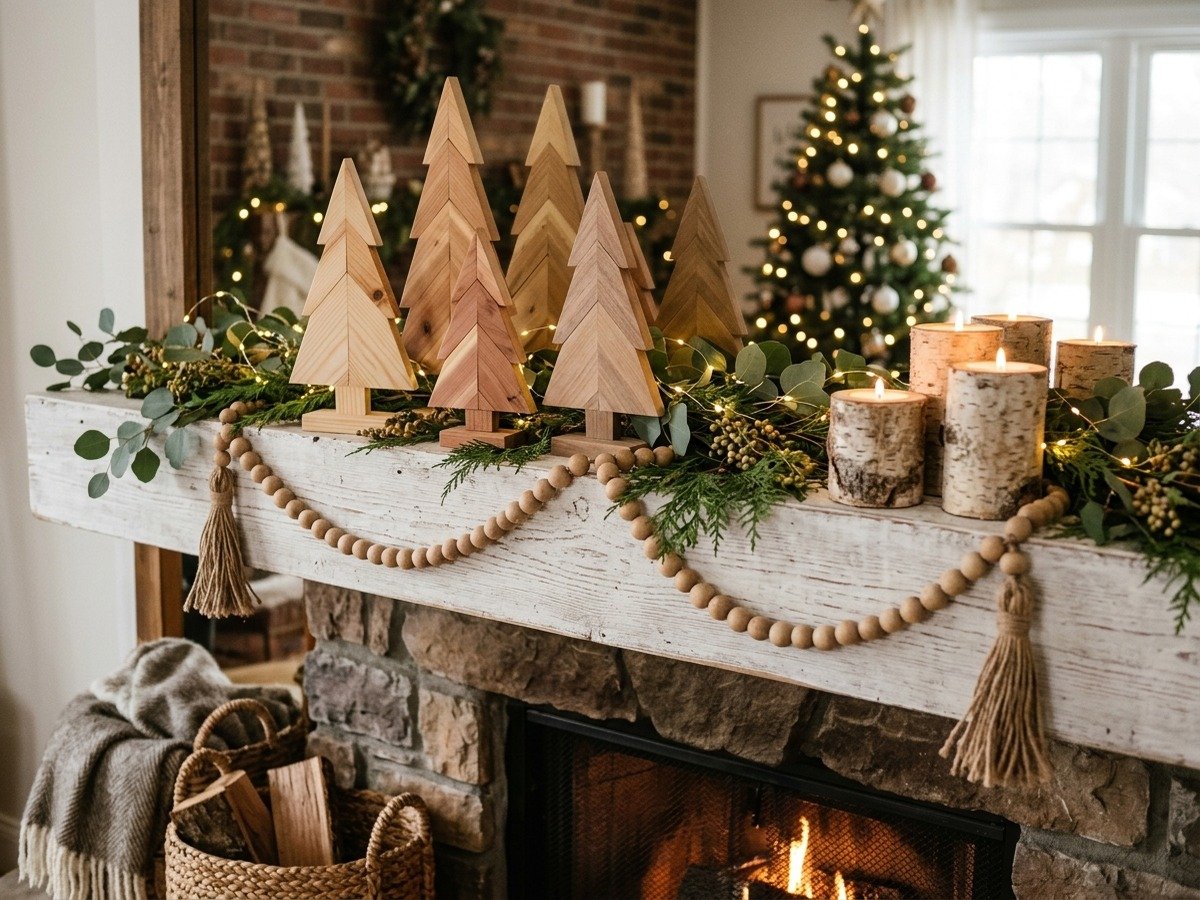
Once your wooden trees, candle pedestals, and garlands are complete, styling them together brings the magic alive. The secret to cohesive holiday styling lies in balancing warm timber textures with organic greenery and soft ambient illumination.
The Rule of Odd Groupings: Arrange your scrap wood trees in clusters of three or five rather than pairs. Stagger taller and shorter trees to build depth. Placing a small warm-toned cedar tree in front of two taller blonde pine cutouts creates natural visual layering.
Incorporate Fresh Winter Botanical Sprigs: Wood pieces shine brightest when paired with living botanicals. Weave fresh cedar boughs, silver dollar eucalyptus, and juniper sprigs around the tree bases on your mantel. As the greenery dries, its muted grayish tones harmonize effortlessly with natural wood grains.
Warm Ambient Lighting: Position micro LED copper wire fairy lights beneath your greenery boughs. The warm 2700K illumination bounces gently off the beeswax-burnished timber facets, creating long soft shadows and a comforting fireside atmosphere throughout dark winter evenings.
Frequently Asked Questions About DIY Wood Christmas Decorations
What is the best wood to use for DIY Christmas decorations?
Softwoods like pine, fir, and spruce are ideal for beginners because they cut easily with hand tools, accept wood stains evenly, and are widely available in budget scrap bins. For natural bark accents, fallen paper birch and cedar branches offer the most striking natural textures.
How do you keep wood slice ornaments from cracking?
Cracking occurs when fresh wood loses moisture too rapidly. Cut slices uniformly to 3/8 inch thickness and bake them slowly in a 200°F (93°C) oven on wire racks for 60 to 90 minutes. Allow them to cool gradually inside the turned-off oven before applying any finish.
Can you make these holiday crafts without expensive power tools?
Yes. A simple Japanese Ryoba pull saw, a hand sanding block with 120 and 220 grit paper, and a standard cordless drill are all you need to complete thirteen of the fifteen projects highlighted in this guide.
What finish keeps wood looking natural without turning yellow?
Skip oil-based polyurethane or lacquer, which oxidize and yellow over time. Instead, use a homemade paste of 1 part melted beeswax and 4 parts mineral oil. It enriches grain patterns, protects the wood surface, and leaves a silky matte Scandinavian luster.
How do you attach tea lights safely to birch log holders?
Drill a 1.5-inch diameter hole roughly 3/4-inch deep into the flat top of each log using a Forstner bit. This standard recess fits tea lights snugly. Always use metal cup tea lights or battery-operated LED votives to prevent flame heat from contacting bare timber.
Handmade holiday decor is about more than seasonal styling. It is an opportunity to slow down, work with your hands, and create lasting pieces filled with holiday memories. Grab a few scrap wood pieces, start with a simple geometric tree or birch candle holder, and enjoy the cozy warmth of handcrafted wood throughout your home this holiday season.

