
Quick Craft Summary
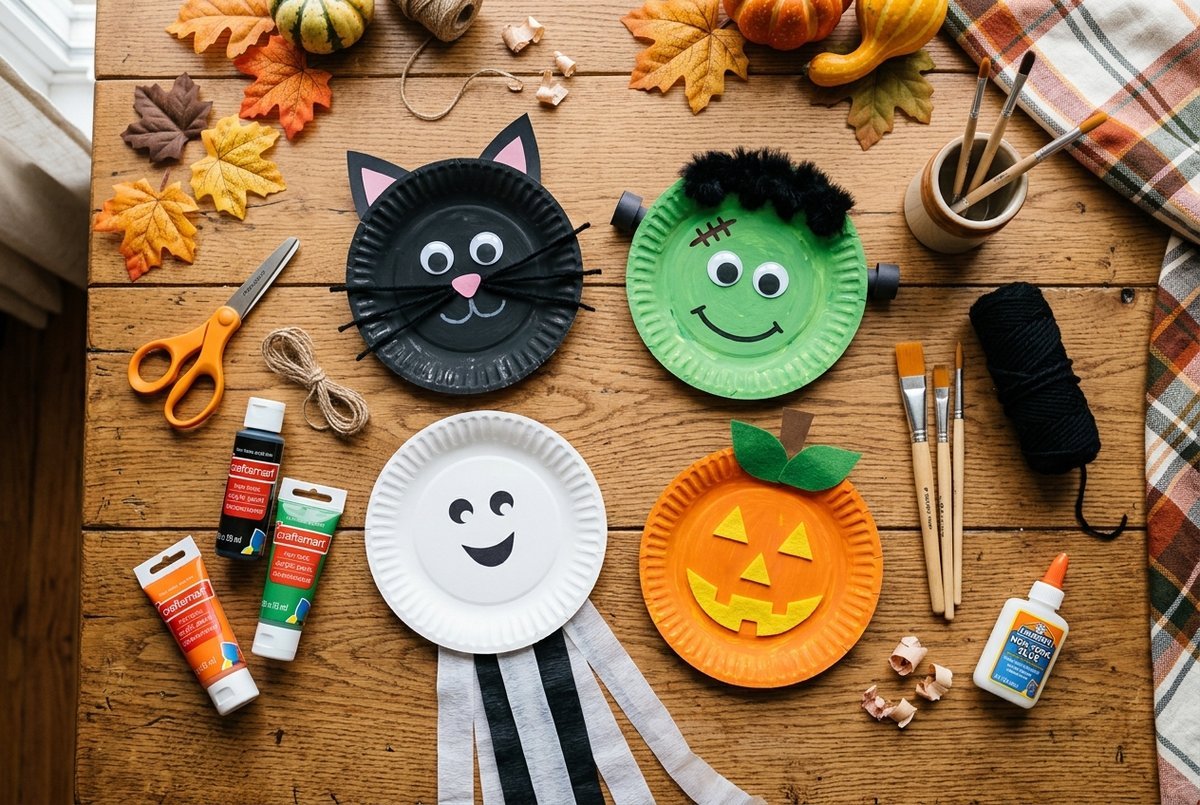
Paper plate Halloween crafts are inexpensive, beginner-friendly DIY projects made from standard uncoated paper plates, non-toxic acrylic paint, construction paper, and yarn. Most designs cost under $0.50 per project, take between 10 to 25 minutes to complete, and require zero specialized tools. From yarn-threaded spider webs to friendly paper plate mummies and glowing jack-o’-lanterns, these 15 projects are ideal for toddler sensory play, classroom craft stations, and budget-friendly home Halloween decor. If you love quick seasonal projects, explore our guide to 12 easy handmade gift ideas for friends.
In this complete guide, you will discover 15 creative paper plate Halloween crafts categorized by difficulty and drying time. Every single project includes an exact materials list, cost breakdown, step-by-step assembly instructions, and practical tips to avoid messy spills and soggy paper.
Essential Supplies for Paper Plate Halloween Crafting
Before diving into the tutorials, gather these basic craft pantry staples. You can purchase almost all of these materials in bulk from discount dollar stores or craft outlets for under $15 total.
| Supply Item | Recommended Type | Estimated Cost | Best Used For |
|---|---|---|---|
| Paper Plates | 9-inch standard uncoated white paper | $1.25 for pack of 50 | Base canvas for all 15 projects |
| Washable Craft Paint | Water-based acrylic or tempera (Orange, Black, Green, Purple) | $4.00 total | Jack-o’-lanterns, cats, Frankensteins |
| Construction Paper / Cardstock | Assorted bright Halloween pack | $2.00 | Ears, stems, wings, facial features |
| Googly Eyes | Mixed multi-pack (10mm to 30mm) | $1.25 | Adds expressive personality instantly |
| Black Acrylic Yarn | Medium 4-ply worsted weight | $2.00 spool | Spider web threading & cat whiskers |
| Adhesives & Tools | PVA craft glue, glue sticks, single hole punch | $3.00 | Assembly & clean lacing holes |
15 Creative Paper Plate Halloween Crafts (Step-by-Step)
1. The Yarn-Laced Paper Plate Spider Web
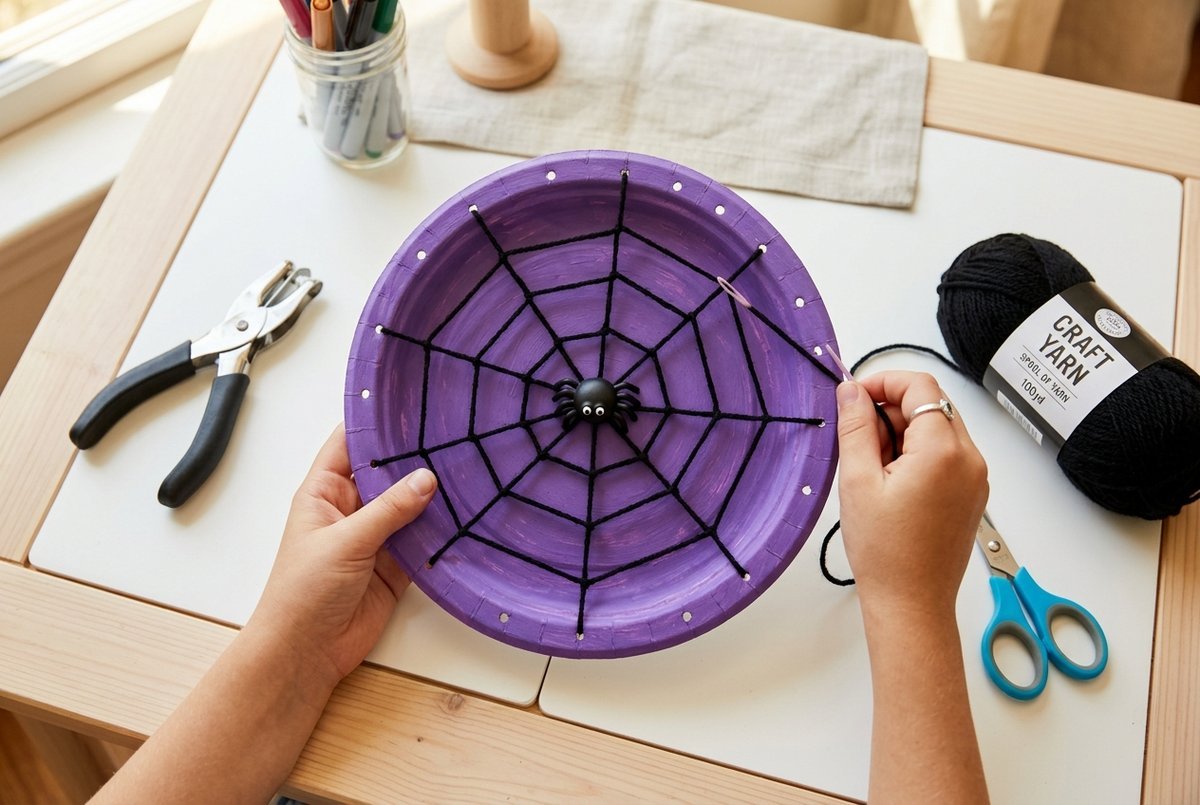
This fine-motor project is an absolute favorite for preschoolers and elementary kids. By cutting out the center disc of a purple or black paper plate and punching holes around the rim, children can weave a criss-cross yarn web and glue a plastic spider right in the center.
- Time: 15 minutes | Cost: ~$0.30 per craft
- Step 1: Paint the rim of a paper plate deep purple or midnight black. Allow 10 minutes to dry.
- Step 2: Cut out the inner circle of the plate, leaving a 1.5-inch outer ring.
- Step 3: Using a single-hole punch, punch 12 to 16 holes evenly around the inner edge of the ring.
- Step 4: Tie a 3-foot piece of black yarn to one hole, wrap a piece of masking tape around the opposite end to act as a child-safe needle, and let your child thread randomly across the center.
- Step 5: Tie off the yarn on the back and glue a friendly plastic spider or pom-pom spider in the web center.
2. Spooky-Cute Paper Plate Black Cat with Yarn Whiskers
Black cats are an iconic Halloween staple. This classic craft uses a single paper plate for the face, with two triangle cutouts from black cardstock for ears and soft yarn pieces for tactile whiskers.
- Time: 15 minutes | Cost: ~$0.25
- Step 1: Paint the entire front surface of a paper plate with rich black acrylic paint.
- Step 2: Cut two large triangles from black construction paper and two slightly smaller pink triangles for the inner ears. Glue the pink pieces onto the black ears, then attach them to the top rim of the plate.
- Step 3: Glue two large green or yellow cardstock eyes (with black marker pupils) in the upper half.
- Step 4: Glue a pink heart-shaped nose in the center, and attach 6 strands of 3-inch black yarn radiating outward for whiskers.
- Step 5: Use a white gel pen or chalk marker to draw a smiling mouth line underneath the nose.
3. The Glowing Paper Plate Jack-o’-Lantern Sun Catcher
Unlike solid painted pumpkins, this sun-catcher variation looks magical when taped to a sunny window. Light shines through orange tissue paper squares, creating the illusion of a glowing carved lantern.
- Time: 20 minutes | Cost: ~$0.40
- Step 1: Cut out the inner circle of an uncoated paper plate, leaving only the outer rim.
- Step 2: Cut a circle of clear adhesive contact paper slightly larger than the cutout and stick it to the back of the rim (sticky side facing up).
- Step 3: Have children place 1-inch squares of bright orange, amber, and yellow tissue paper across the sticky surface until fully covered.
- Step 4: Cut triangle eyes, a nose, and a jagged mouth from black cardstock and stick them onto the tissue paper front.
- Step 5: Add a brown cardstock stem and a green paper leaf to the top rim and hang in a sunlit window.
4. Frankenstein Monster with Yarn Hair and Paper Neck Bolts
A friendly lime-green Frankenstein monster lets kids practice scissor skills while adding fun 3D textures like fluffy yarn hair and metallic neck bolts.
- Time: 20 minutes | Cost: ~$0.35
- Step 1: Paint a paper plate with bright lime green tempera or acrylic paint. Let dry completely.
- Step 2: Cut a jagged strip of black felt or yarn fringe and glue it across the top rim for Frankenstein’s signature flat-top hair.
- Step 3: Glue two oversized googly eyes on the face.
- Step 4: Use a black permanent marker to draw a straight stitched mouth, a curved nose, and a diagonal forehead scar with stitch tick marks.
- Step 5: Cut two neck bolts from grey cardstock (or silver foil wrapped cardboard) and glue them to the back left and right edges of the plate.
5. Floating Paper Plate Ghost with Crepe Streamers
This project requires zero paint drying time, making it ideal for large groups and quick classroom craft stations. White crepe streamers flutter delightfully whenever air currents pass by.
- Time: 10 minutes | Cost: ~$0.20
- Step 1: Keep the paper plate white. Cut out two large oval eyes and an open oval mouth from black construction paper.
- Step 2: Glue the facial features onto the center of the plate to create a surprised or smiling ghost expression.
- Step 3: Cut 5 to 7 strips of white crepe paper or party streamers, each roughly 18 to 24 inches long.
- Step 4: Turn the plate over and glue or staple the streamer ends along the bottom half of the rim.
- Step 5: Punch a small hole at the top, tie a loop of clear fishing line or cotton string, and hang it from ceilings or porches.
6. Textured Paper Plate Mummy with Gauze Bandages
This tactile craft teaches layering. By criss-crossing strips of white paper, masking tape, or first-aid gauze across a dark backing, children create realistic mummy wraps with peeking yellow eyes.
- Time: 15 minutes | Cost: ~$0.30
- Step 1: Paint the center of a paper plate black or dark brown.
- Step 2: Glue two large yellow cardstock circles (or oversized googly eyes) horizontally in the upper-middle area.
- Step 3: Cut white printer paper or rolled medical gauze into 1-inch wide strips.
- Step 4: Layer and glue the strips at angles across the plate, leaving just the eyes peeking through the gaps.
- Step 5: Trim any overlapping bandage excess around the circular plate edge for a clean silhouette.
7. The Flying Paper Plate Bat with Scalloped Wings
By cutting one paper plate in half to form scalloped wings and using another full plate for the body, you create a dramatic 3D flying bat ready to mount on walls.
- Time: 20 minutes | Cost: ~$0.35
- Step 1: Paint two paper plates entirely black. Let dry.
- Step 2: Take the first plate and cut it in half. On the straight edge of each half, cut out three semicircles to form classic bat wing scallops.
- Step 3: Staple or glue the wings to the back of the second full plate so they extend outward on either side.
- Step 4: Glue two small black cardstock triangles on the top rim for bat ears.
- Step 5: Add two googly eyes and glue two small white paper fangs pointing downward from the mouth area. For real-life bat anatomy and conservation facts to share while crafting project #7, check out Bat Conservation International.
8. Paper Plate Witch with Burlap Hair and Pointed Hat
This colorful project combines green paint, purple or orange yarn hair, and a crisp black cone hat decorated with a yellow buckle.
- Time: 25 minutes | Cost: ~$0.45
- Step 1: Paint a paper plate bright green for the witch’s skin.
- Step 2: Cut a large black triangle from cardstock for the hat cone and a black crescent for the hat brim. Glue together and add an orange band with a square yellow paper buckle.
- Step 3: Cut 20 strands of 6-inch orange or purple yarn. Glue them in clusters along the upper rim on both sides to form wild witch hair.
- Step 4: Glue the black hat over the top rim, securing the yarn roots underneath.
- Step 5: Draw a crooked wart-covered nose, googly eyes, and a jagged smile with marker.
9. Glowing Monster Eye with Swirling Red Capillaries
Kids love creating giant creepy eyeballs. Using watercolor blending or marker bleeding on white plates produces vivid, bloodshot monster eyes that make fantastic porch garlands.
- Time: 15 minutes | Cost: ~$0.20
- Step 1: In the exact center of a white paper plate, draw and paint a 4-inch vibrant iris (lime green, radioactive yellow, or electric violet).
- Step 2: Paint a solid 2-inch black circle in the middle of the iris for the pupil (or cut out a cat-slit pupil from black paper).
- Step 3: Add a small white paint highlight dot on the pupil to give it a lifelike glassy reflection.
- Step 4: Use a fine-tip red marker or thin red yarn strands dipped in glue to draw squiggly capillary veins branching from the outer rim inward toward the iris.
10. Haunted House Moonlit Silhouette Plate
This mixed-media craft teaches gradient blending and contrast. A glowing yellow-and-orange sunset moon provides the dramatic background for a spooky black paper house cutout.
- Time: 25 minutes | Cost: ~$0.35
- Step 1: Sponge-paint the plate with swirling concentric rings of yellow in the center blending into bright orange, purple, and midnight blue along the outer fluted rim.
- Step 2: Cut a crooked silhouette of a Victorian haunted house with gables, turrets, and dead bare trees from black cardstock.
- Step 3: Once the background paint is dry, glue the black haunted house silhouette across the bottom two-thirds of the plate.
- Step 4: Cut tiny yellow squares and glue them into the house windows so they appear illuminated from within.
- Step 5: Add tiny black bat stickers or marker silhouettes flying across the moonlit sky.
11. Paper Plate Skeleton with Q-Tip Ribcage
Combine a paper plate skull with cotton swab (Q-tip) bones for an engaging STEM-adjacent anatomy craft that looks remarkably realistic when hung on a dark door.
- Time: 20 minutes | Cost: ~$0.30
- Step 1: Cut the sides of a white paper plate inward to form the classic tapered shape of a skull and jaw.
- Step 2: Cut two large black circles for eye sockets, an upside-down black heart for the nasal cavity, and draw vertical black tooth lines across the bottom jaw.
- Step 3: On a strip of black cardstock hanging below the plate, glue one vertical cotton swab for the spine.
- Step 4: Glue 6 to 8 horizontal cotton swabs across the spine at intervals to represent the ribcage.
12. Paper Plate Candy Corn Segment Triangles
A single round paper plate can be cut into 6 to 8 pie wedges to create an entire garland of sweet candy corn pennants.
- Time: 15 minutes | Cost: ~$0.15
- Step 1: Paint a paper plate with three concentric colored bands: pure white in the center circle, bright orange in the middle band, and vibrant yellow on the outer fluted rim.
- Step 2: Once dry, cut the plate into 6 or 8 equal triangular pizza slices.
- Step 3: Each slice now forms an authentic candy corn with white at the pointed tip, orange in the center, and yellow along the wide curved base.
- Step 4: Hole-punch the top corners of each wedge and string them onto jute twine to form a festive party bunting garland. You can also mix these paper banners with our DIY room decor ideas for small spaces.
13. Bubbling Witch’s Cauldron with Pom-Pom Brew
Cut a paper plate in half and paint it black to form a cauldron bowl, then pile green glitter pom-poms over the rim to look like a magical bubbling potion.
- Time: 15 minutes | Cost: ~$0.40
- Step 1: Cut off the top third of a paper plate, leaving a deep rounded cauldron shape. Paint it matte black.
- Step 2: Cut two black cardstock feet and attach them to the bottom.
- Step 3: Along the flat top rim, glue an assortment of neon green, purple, and chartreuse craft pom-poms spilling over the edge.
- Step 4: While the glue is wet, dust with iridescent green glitter to create a shimmering magic effect.
14. Friendly Paper Plate Vampire with Accordion Cape
Give Count Dracula a friendly makeover with slicked-back widow’s peak hair, bright red paper bow tie, and an accordion-folded black paper cape.
- Time: 20 minutes | Cost: ~$0.35
- Step 1: Paint a paper plate pale ivory or soft grey.
- Step 2: Cut a black cardstock widow’s peak hairline and glue it along the top rim.
- Step 3: Add googly eyes, a smiling mouth with two white triangle fangs, and tiny red marker drops at the fang tips.
- Step 4: Accordion-fold a sheet of black construction paper and staple it beneath the chin to form a ruffled vampire collar and cape.
- Step 5: Attach a bright crimson paper bow tie in the center of the collar.
15. Nighttime Barn Owl with Ruffled Paper Feathers
This woodland-themed Halloween craft layers brown, tan, and cream cupcake liners or ripped paper scraps over a folded plate to create realistic feathery texture.
- Time: 25 minutes | Cost: ~$0.40
- Step 1: Fold both outer sides of a paper plate inward toward the center to create curved owl wings, then fold the top rim downward to create the triangular head.
- Step 2: Paint the body warm earthy brown and the wings tan.
- Step 3: Glue two large orange cardstock circles with black center pupils for piercing owl eyes.
- Step 4: Add a small yellow triangle beak between the eyes.
- Step 5: Layer small torn scallops of brown and cream tissue paper across the belly for authentic feathered fluff.
Pro Maker Tips for Clean, No-Mess Crafting
Callum’s Workshop Tips for Success:
- Choose Certified Non-Toxic Supplies: When crafting with younger children, always ensure you use non-toxic, water-based tempera or acrylic paints certified under ACMI AP child safety standards (ASTM D-4236).
- Choose Uncoated Paper Plates: Avoid glossy or plastic-coated plates. Cheap, uncoated paper absorbs acrylic paint and white glue instantly without beading or peeling.
- Prevent Paper Warping: If applying heavy paint, paint both the front and back lightly. As both sides dry and contract equally, the plate will remain perfectly flat instead of curling.
- Child-Safe Needle Trick: When doing yarn weaving crafts (like the spider web), wrap a 1-inch piece of masking tape tightly around the working yarn tip to create a stiff, safe threading guide that won’t fray.
- Quick Drying Hack: Use a handheld hairdryer on the low/cool setting to speed up paint drying between steps during classroom sessions.
Frequently Asked Questions
What is the best glue to use for paper plate crafts?
Standard liquid PVA craft glue (Elmer’s) works best for porous surfaces like yarn, pom-poms, and googly eyes. For flat paper-on-paper adhesion, washable glue sticks dry faster and prevent paper bubbling.
Can toddlers do these Halloween crafts independently?
Projects like the Floating Ghost (#5), Mummy (#6), and Jack-o’-Lantern Sun Catcher (#3) are ideal for toddlers aged 2-4 with minimal adult assistance. Projects requiring hole-punching or precise scissor trimming (like the Spider Web #1 or Witch #8) are best suited for ages 5 and up.
How do I hang finished paper plate crafts?
Tape a loop of baker’s twine or jute cord to the back rim, or use painter’s tape/poster putty for damage-free wall and window displays.

