
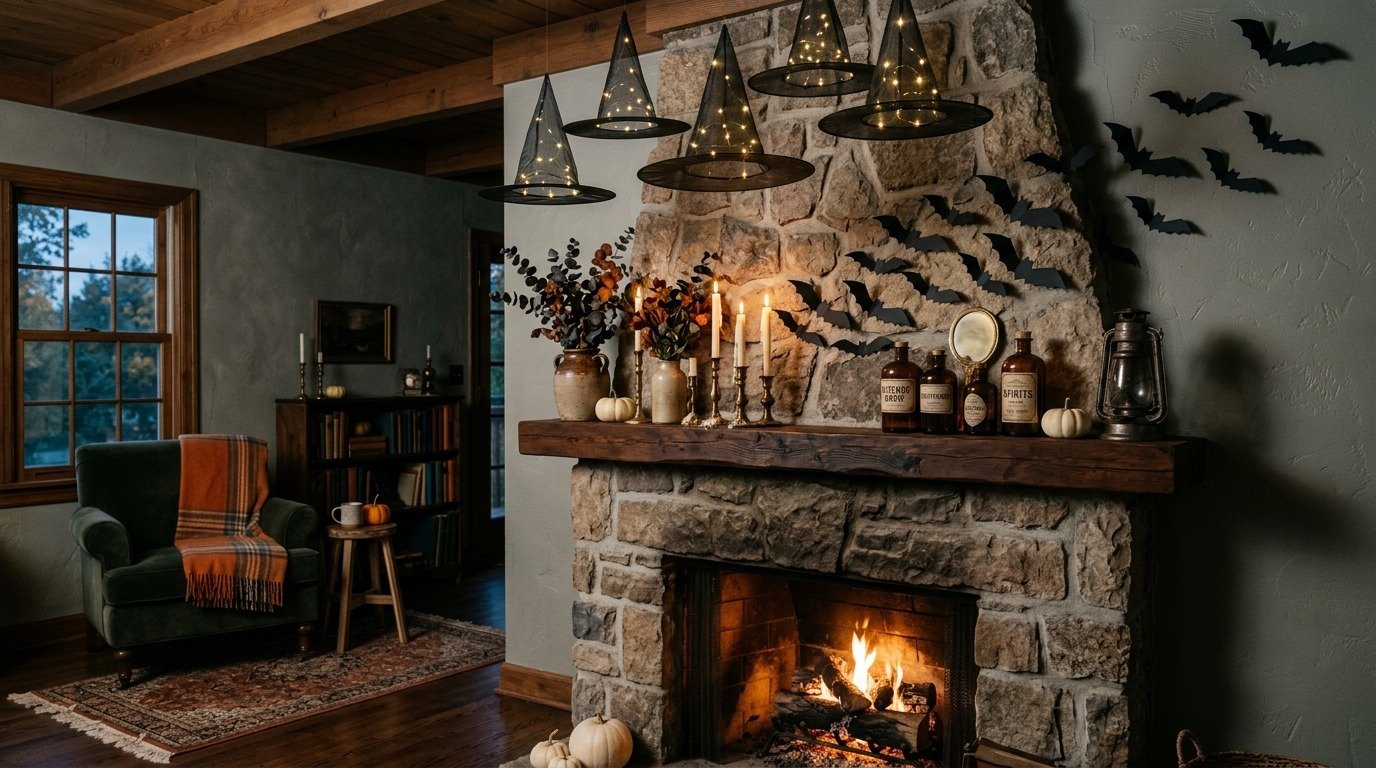
When October arrives, there is a distinct thrill in embracing the mysterious, shadowy side of autumn design. However, decorating for the season does not mean you have to sacrifice your carefully curated home style for neon orange plastic skeletons or garish synthetic spiderwebs. A modern, refined approach to diy spooky halloween decorations embraces vintage gothic romance, moody natural elements, and understated drama that feels sophisticated and intentionally atmospheric.
By blending organic materials like dried dark botanicals, unbleached linen, textured cardstock, antique glassware, and flickering amber candlelight, you can craft haunting accents that complement your existing furniture. Whether you want to send a dimensional swarm of black bats spiraling up your living room chimney, suspend a constellation of glowing witch hats from wooden ceiling beams, or style an arcane apothecary bar on your sideboard, these fifteen creative projects will help you celebrate the holiday with charm, artistry, and budget-conscious ease.
Quick Answer: How to Create Aesthetic Spooky Halloween Decor
To craft aesthetic DIY spooky halloween decorations without crossing into tacky plastic or gore, focus on atmospheric textures, high-contrast silhouettes, and warm ambient candlelight. Core projects include folding 3D matte black cardstock bats that flutter across fireplaces, suspending illuminated black sheer witch hats with invisible fishing line, and aging glass apothecary bottles with brewed tea washes. Combining organic materials like preserved dark botanicals, raw linen, antique brass candleholders, and black velvet creates an elegant haunted mansion aesthetic that feels cozy, moody, and sophisticated.
The Philosophy of Aesthetic Spooky Decor
Traditional Halloween novelties often feel disjointed because they rely on saturated plastic tones and artificial textures. When you adopt a chic maker approach to seasonal styling, you build cohesion through three foundational design principles:
- Embracing a Moody, Restrained Color Palette: Build your seasonal color story around deep charcoal, matte onyx, warm terracotta, antique gold, aged parchment, and warm bone white. This tight palette looks intentional rather than chaotic.
- Layering Organic Textures: Incorporate natural elements such as real branches, dried eucalyptus, seed pods, raw cotton cord, and rough linen. These tactile materials soften stark black accents and prevent your decor from looking synthetic.
- Prioritizing Low, Atmospheric Lighting: Harsh overhead lights instantly ruin a spooky mood. Instead, rely on soft amber glows, battery-powered flicker tapers, and warm micro fairy lights hidden inside your decor pieces.
While gathering materials for these crafts, safety should remain a central priority when styling elevated textiles and delicate paper. According to the Consumer Product Safety Commission holiday safety standards, using cool-to-the-touch battery LED fairy lights and flameless candles is strongly recommended when constructing displays that incorporate combustible cardstock, sheer tulle, or dried branches.
15 Curated DIY Spooky Halloween Decor Concepts for an Aesthetic Home
1. The 3D Matte Black Cardstock Bat Swarm
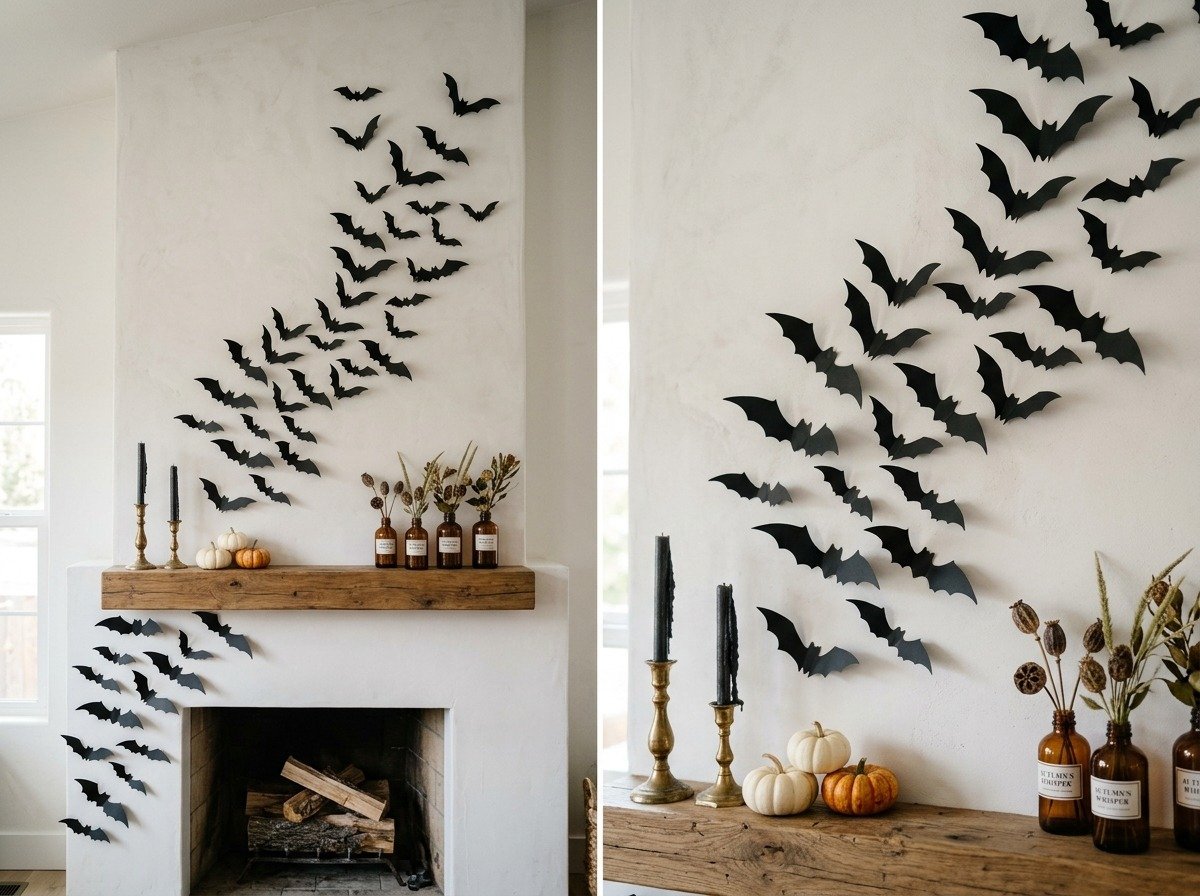
Few DIY projects deliver more dramatic visual impact for minimal investment than a dimensional paper bat installation. Instead of scattering flat stickers randomly, clustering bats in a natural swirling formation creates an organic illusion of flight, drawing the eye upward and energizing high ceilings or empty walls.
Supplies Needed:
-
Heavyweight matte black cardstock (65 lb to 80 lb)
-
Bat silhouette templates in four graduated sizes (ranging from 3 inches to 10 inches wide)
-
Sharp precision craft scissors or a digital cutting machine
-
Removable mounting putty or painter-safe foam tape
Step-by-Step Tutorial:
- Cut in Multiple Sizes: Cut roughly 35 to 50 bats across your four distinct sizes. Having small, medium, large, and extra-large bats is the secret to achieving believable depth and perspective.
- Score and Fold for 3D Dimension: Using a ruler or bone folder, gently score two vertical lines along either side of the bat body. Fold the wings forward along these creases. This allows the body to lie flat against the wall while the wings lift out at dynamic 45-degree angles, casting real shadows as light changes throughout the day.
- Map Your Swarm Path: Before applying tape, sketch a gentle S-curve or diagonal flight path with your eye. Start low near a hearth, bookshelf, or window frame with dense clusters of large bats, then taper outward toward the ceiling with smaller bats spaced further apart.
- Secure and Adjust: Press a pea-sized dot of removable poster putty to the flat center body of each bat and anchor it to the wall. Angle the bats slightly in varying directions to suggest erratic, lifelike flight.
2. Floating Illuminated Witch Hats
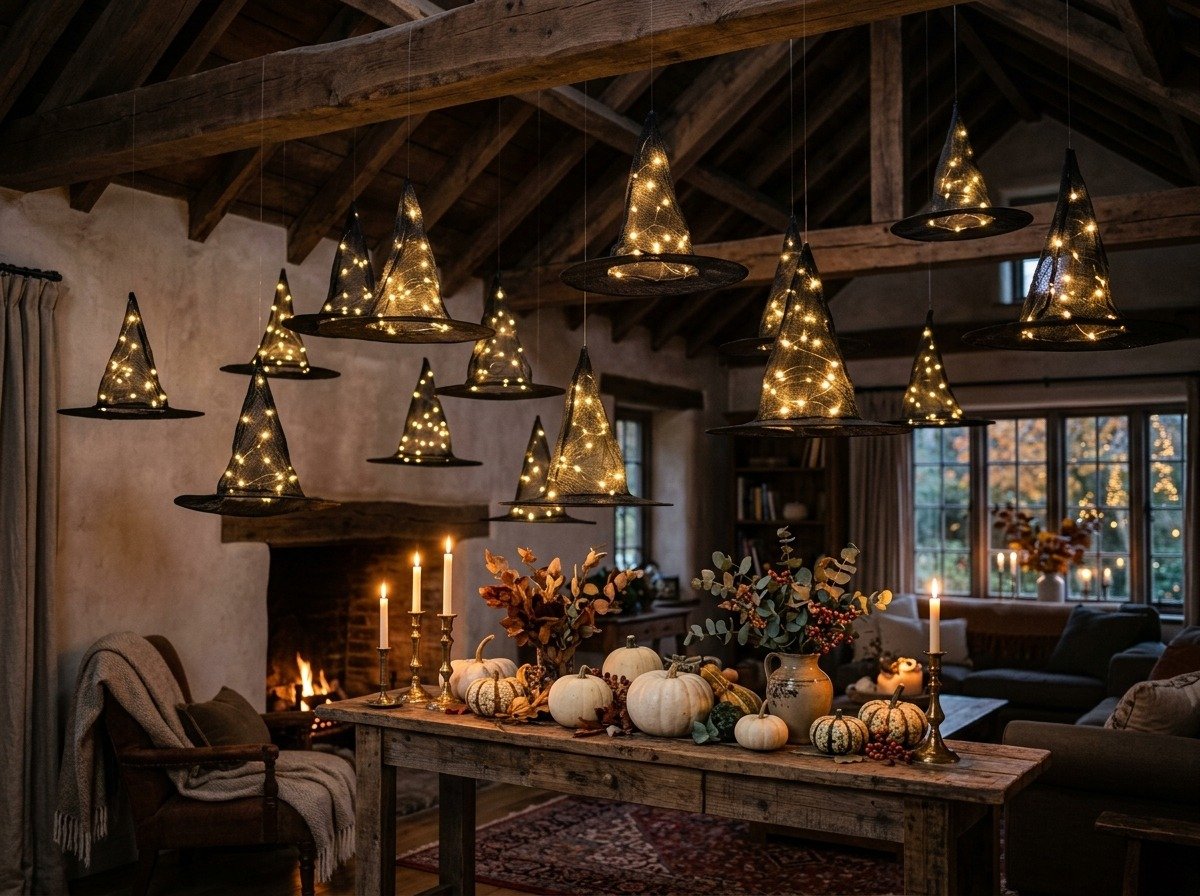
Suspending pointed witch hats in mid-air creates an enchanting, storybook effect that looks straight out of a wizard academy. By tucking warm battery micro fairy lights inside the cones, the hats glow like lanterns when dusk falls.
Supplies and Setup:
Pick up a multi-pack of inexpensive black fabric or woven straw witch hats from a local craft shop. Thread a needle with clear 6 lb to 8 lb monofilament fishing line. Pass the needle through the very tip of the hat cone from the inside out, securing a small button or bead on the interior to act as a stopper so the thread does not tear through the fabric.
Take a 6-foot strand of warm white copper wire fairy lights operated by a compact battery pack. Coil the lights inside the hat cone, securing the light wire with a few safety pins along the inner brim. Use painter tape to tape the lightweight battery box snugly inside the top of the crown so it remains completely hidden from view below.
Hang the free ends of the fishing line from your ceiling using clear removable adhesive ceiling hooks. Stagger the hats at varying hanging heights, between 12 and 24 inches apart, over a hallway or above a dining room table. This styling approach coordinates beautifully with the illuminated floating spirits featured in our recent guide on aesthetic DIY ghost decor ideas.
3. Antique Glass Apothecary Potion Bottles
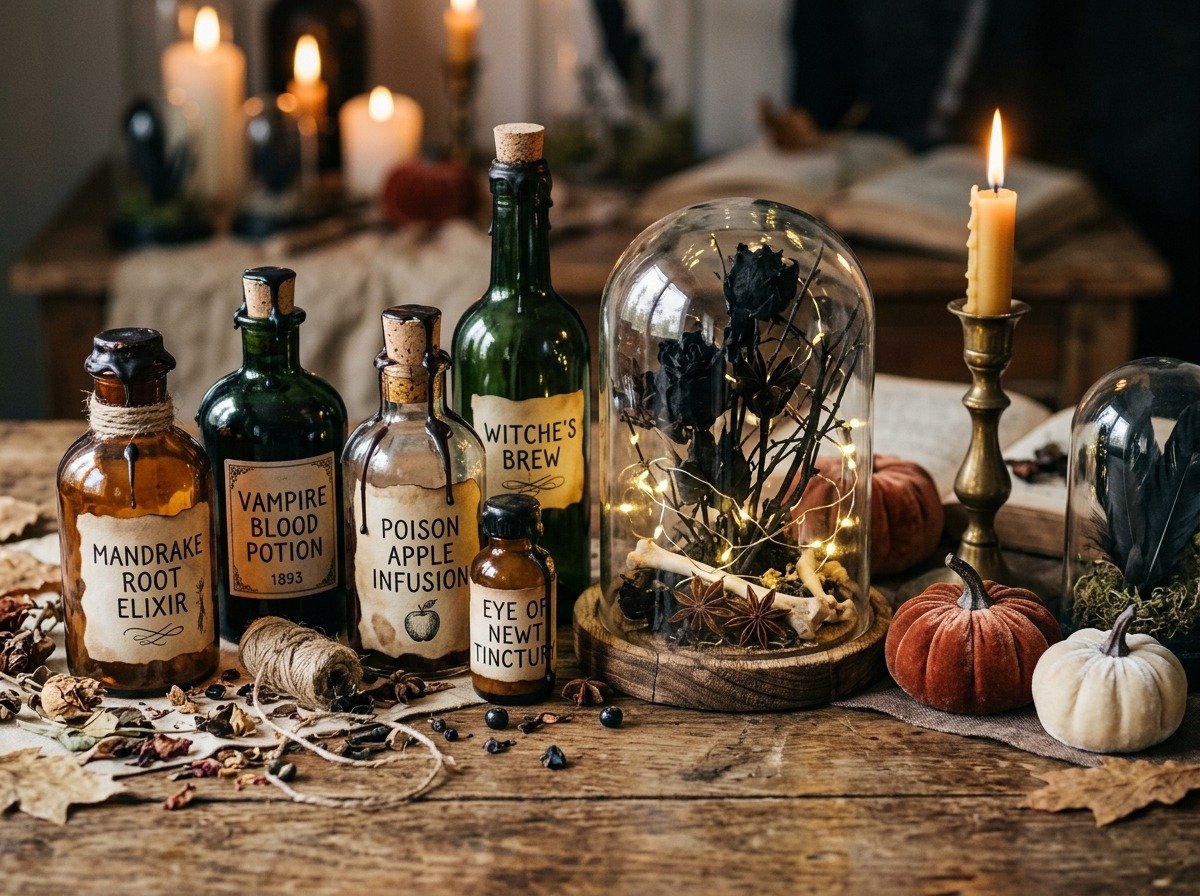
Every witch pantry needs an intriguing collection of elixirs, draughts, and dried specimens. Rather than buying overpriced novelty props, you can upcycle everyday condiment bottles, olive oil jars, and thrifted glass flasks into a museum-worthy apothecary display.
Aging the Glass and Crafting Labels:
Rinse empty amber, green, and clear glass bottles thoroughly in warm soapy water and peel off commercial stickers. To give clear glass an antique smoky patina, mist the exterior lightly with matte black or frosted glass spray paint from 18 inches away, wiping high points immediately with a rag for an aged, dusty film.
Print or hand-letter vintage apothecary labels onto plain printer paper. To distress the paper, brush it generously with strong black tea or leftover brewed coffee, then tear the outer edges unevenly by hand. Once dry, scorch the perimeter carefully with a lighter for authentic burnt edges. Adhere the labels to your bottles using a light coat of craft decoupage glue.
Fill the bottles with water tinted with green food dye, dried black beans, dried lavender buds, or star anise. Cap the bottles with natural tapered corks, and drizzle melted black or deep burgundy sealing wax over the cork caps, letting wax droplets run down the bottle neck.
4. Gothic Botanical and Feather Cloche Dioramas
Curiosity glass bell jars and cloches bring Victorian naturalist intrigue into any room. Creating a spooky botanical cloche allows you to preserve beautiful organic textures while adding an eerie seasonal twist.
Start with a natural wood cloche base. Secure an upright dried seed pod, lotus head, or blackened thistle branch into the base using floral clay. Surround the branch with preserved dark reindeer moss and dried black rosebuds. Place a small replica bone, miniature resin crow skull, or natural black goose feathers nestled in the moss. Drape a miniature strand of warm micro battery lights around the interior branches before lowering the glass dome over your creation. This project makes an exquisite centerpiece that pairs naturally with our ideas for aesthetic DIY fall table centerpieces.
5. Black Lace and Linen Wrapped Candle Luminaries
Lighting is the emotional heartbeat of Halloween decor. You can turn ordinary glass cylinder vases or mason jars into moody gothic luminaries using strips of black lace fabric, burlap, or loose cheesecloth.
Cut black floral lace or unbleached linen to wrap snugly around a glass tumbler or cylinder vase. Adhere the fabric to the glass using spray adhesive or double-sided tape. Wrap natural jute twine around the jar neck several times and tie it off with a rustic bow. When an LED flicker candle is placed inside, the intricate lace patterns cast elaborate, dancing shadows across nearby walls, filling the room with an enchanting amber glow.
6. Distressed Antique Gold Spooky Portrait Mirrors
A classic staple of gothic ghost stories is the haunted mirror that seems to harbor an otherworldly presence. You can thrift inexpensive ornate plastic or wooden picture frames and transform them into antique gilded looking-glasses with eerie transparency.
Paint the frame in matte black, then dry-brush the carved relief details with metallic antique gold wax or acrylic paint. Replace the standard glass with a two-way mirrored film or coat the backside of the glass lightly with looking-glass mirror spray paint. Behind the distressed glass, mount a vintage black-and-white tintype portrait. In normal daylight, the mirror reflects the room, but when evening candlelight hits the glass from a slight angle, the ghostly portrait behind the silvering becomes subtly visible.
7. Moody Black Velvet and Twine Pumpkins
While traditional orange pumpkins celebrate harvest abundance, crafting pumpkins wrapped in luxurious matte black, charcoal, or deep plum velvet infuses your room with high-fashion drama. This tutorial expands upon the knotting techniques we explored in our comprehensive guide on making a DIY macrame pumpkin pattern.
Carve out the center core of a small foam craft pumpkin. Cut an 18-inch circle of stretch velvet fabric. Center the foam pumpkin on the fabric, pull the velvet edges upward into the core opening, and secure them with craft glue. For the ultimate natural finishing touch, glue a real dried pumpkin stem or a small piece of cinnamon bark into the top opening. Tie a strand of raw jute twine around the stem to ground the luxurious velvet texture.
8. Painted Black Willow Branches and Raven Perch Arrangement
Foraging natural materials from your own backyard provides incredible architectural structure for seasonal displays at zero cost. Long, gnarled tree branches, twisted willow stems, or fallen birch limbs possess organic silhouettes that look striking when transformed into silhouetted indoor sculptures.
To ensure botanical longevity and prevent premature brittleness, following botanical preservation practices outlined by Oregon State University Extension forestry and horticulture guides ensures foraged wood is properly sanitized, dried, and preserved against indoor moisture decay.
After stripping any loose decay and allowing the branches to dry thoroughly indoors for two days, coat them in two even passes of ultra-matte black spray paint. Place the branches inside a heavy stoneware crock or matte black floor urn. Perch two realistic craft faux-feather ravens or crows on the upper limbs. Weave a copper strand of warm fairy lights through the branches for an ethereal nighttime focal point.
9. Stained Gauze and Black Tea Spiderweb Drapes
Synthetic white polyester spiderwebs bought in bags often tear unevenly, catch on furniture, and look painfully artificial. A far more realistic and elegant alternative is crafting draped spiderwebs from loose cotton cheesecloth or open-mesh tobacco cloth.
Brew four bags of black tea in a bucket of hot water to create a soft, dingy tan tint. Submerge grade 10 unbleached cheesecloth in the tea bath for thirty minutes to antique the white cotton. Wring it out and hang it outside to dry. Once dry, use sharp fabric shears to make small random snips throughout the fabric, then use your fingers to pull, stretch, and rip the threads into gossamer webbing. Drape these tattered webs over your fireplace mantel, across mirror corners, or over porch railings alongside our cozy DIY fall porch decor styling.
10. Gilded Skull Bookends and Literary Displays
Add literary gothic charm to your bookshelves, console table, or nightstand by creating sculptural skull bookends. Start with two lightweight plastic anatomical skulls from a dollar store craft aisle. To give them substantial heft, drill a small hole in the base, pour in play sand or plaster of Paris, and hot-glue the hole shut.
Paint the skulls in matte charcoal chalkboard paint. Once dry, gently rub gold gilding wax over the brow, cheekbones, and teeth using a soft rag to highlight bone contours. Mount each weighted skull onto a 90-degree metal bookend or salvaged wooden block. Stack vintage leather-bound poetry volumes and dark botanical encyclopedias between them for an instant scholarly aesthetic.
11. Clay Witch Cauldron Incense and Tea Light Holders
Miniature cauldrons crafted from air-dry clay make charming accent pieces for nightstands, coffee tables, and desks. Roll out black or terracotta air-dry clay into a small bowl form, gently smoothing three small spherical clay balls onto the bottom to act as sturdy cauldron feet.
Roll a thin clay coil and blend it around the upper rim to form a raised cauldron lip. Before the clay cures, insert an inverted tea light to ensure the interior chamber remains the perfect size. Allow the clay to cure for 48 hours. Insert a battery-operated flicker tea light or use it to hold fragrant autumn incense cones of cedarwood, clove, and cinnamon that gently waft seasonal aromas through your home.
12. Macrame Black Rope Bat and Moon Wall Hanging
Bohemian fiber art transitions seamlessly into spooky season when knotted with black cotton cord. Combining crescent moon metal hoops with knotted macrame creates an eye-catching wall sculpture that can hang proudly in your home throughout the autumn months.
Wrap a 10-inch crescent moon metal macrame hoop tightly in 3mm black cotton cord. Across the bottom curve, attach eight 4-foot strands of black cord using lark head knots. Work three rows of diagonal clove hitches to mimic the sweeping wings of a flying bat. Comb out the remaining cord ends into a feathered fringe, trimming the bottom in a sharp V-shape. Hang a small raw clear quartz crystal or brass star charm in the hollow of the crescent moon for celestial sparkle.
13. Spellbound Floating Candelabra Centerpiece
Create the illusion of an enchanted dining hall by styling a floating candelabra illusion above your table. You can suspend lightweight paper towel tubes painted like dripping wax tapers, or install battery-operated LED taper candles directly from ceiling hooks using fine monofilament line.
To craft realistic dripping wax along the candle barrels, use a high-temperature hot glue gun to run thick, overlapping drips down the sides of the candle tubes before painting them with matte ivory acrylic paint. Hang five to seven candles at alternating heights above your table. Most modern battery tapers include remote controls, allowing you to turn on the floating flicker with a single click, instantly mesmerizing dinner guests.
14. Vintage Book Page and Pressed Fern Silhouette Frames
For lovers of understated, botanical seasonal art, silhouette framing offers timeless sophistication. Source discarded, damaged vintage books from local thrift sales. Carefully remove several yellowed, typography-dense pages containing classic literature or poetry.
Press dark autumn oak leaves, delicate fern fronds, or dried black floral petals between heavy books for several days. Glue the dried botanical silhouette onto the center of the vintage text page using a glue stick. Mount the artwork inside a simple black or antique gold floating glass frame. Hang a gallery grouping of four frames along a hallway or entryway to introduce subtle, nature-inspired seasonal mystery.
15. Hanging Witch Broom and Dried Lavender Door Chime
Welcome friends and trick-or-treaters to your front entryway with a handcrafted rustic door broom that brings textural warmth and a delightful autumn fragrance. This charming threshold piece coordinates seamlessly with our step-by-step boho DIY fall wreath tutorial.
Select a 24-inch natural fallen birch stick to serve as the broom handle. Gather dried broom corn, birch twigs, and bundles of dried French lavender and eucalyptus around the bottom 8 inches of the handle. Bind the bundle securely using heavy natural jute twine, wrapping the twine tightly in neat, overlapping coils for roughly 3 inches. Tuck a small brass witch bell into the twine wrapping so that every time your front door opens, a soft, musical chime echoes through your home.
Craft Comparison Matrix: Difficulty, Materials, and Costs
To help you select the ideal weekend projects for your available crafting time and budget, refer to this comprehensive planning guide:
|
Project Title |
Skill Level |
Core Supplies |
Assembly Time |
Estimated Budget |
|---|---|---|---|---|
|
3D Paper Bat Swarm |
Beginner |
Black Cardstock & Mounting Putty |
1 to 2 Hours |
$5 to $10 |
|
Floating Witch Hats |
Beginner |
Fabric Hats, Micro LEDs & Line |
45 Minutes |
$12 to $18 |
|
Antique Apothecary Bottles |
Intermediate |
Recycled Glass, Tea & Sealing Wax |
2 Hours |
$6 to $12 |
|
Botanical Glass Cloche |
Beginner |
Glass Dome, Dried Florals & Moss |
45 Minutes |
$15 to $22 |
|
Black Lace Luminaries |
Beginner |
Glass Jars, Lace & LED Tapers |
30 Minutes |
$4 to $8 |
|
Velvet Pumpkins |
Beginner |
Foam Forms, Velvet & Real Stems |
1 Hour |
$8 to $15 |
|
Spooky Willow Branch Urn |
Beginner |
Foraged Wood, Black Paint & Urn |
1 Hour |
$5 to $10 |
|
Macrame Bat Wall Hanging |
Intermediate |
3mm Black Cord & Metal Hoop |
2 to 3 Hours |
$10 to $16 |
|
Rustic Door Witch Broom |
Beginner |
Birch Stick, Twigs & Dried Lavender |
45 Minutes |
$8 to $14 |
Historical Context: Why We Love Seasonal Folktales and Crafts
Engaging in autumn handcrafts is part of a rich cultural lineage of seasonal transition markers. As documented by cultural archivists at the Library of Congress American Folklife Center, handmade harvest talismans, threshold brooms, and carved lanterns originated as communal folk traditions celebrating the end of the agricultural cycle, transforming fear of winter darkness into communal warmth and creative storytelling.
When you sit down with cord, paper, clay, and dried botanicals to craft your own seasonal pieces, you connect with that enduring tradition of home-centered artistry. You infuse your space with artifacts made by your own hands, fostering a welcoming haven where memories are made throughout the autumn season.
Styling and Layering Your Spooky Home
To achieve a balanced look that feels cohesive throughout your entire floor plan, consider these expert placement strategies:
- Create Defined Focal Zones: Rather than spreading single decorations thinly across every surface, concentrate your efforts into two or three high-impact zones, such as your fireplace mantel, your dining table, and your front entryway console.
- Vary Your Heights and Scales: Pair tall elements like the painted willow branch urn with mid-height apothecary jars and low, ground-level velvet pumpkins. This vertical variety keeps the eye moving naturally through the display.
- Blend with Everyday Bohemian Staples: Place your spooky crafts alongside your everyday woven rattan baskets, chunky cream wool throw blankets, and wooden beaded garlands. This organic integration prevents your seasonal decor from feeling out of place.
With thoughtful craftsmanship, creative material choices, and a warm approach to lighting, you can create a hauntingly beautiful Halloween sanctuary that brings joy, wonder, and cozy seasonal charm to your home all month long.
Frequently Asked Questions
How do you make Halloween decor feel aesthetic instead of tacky?
The key is limiting your color palette to moody, sophisticated tones (matte charcoal, aged ivory, antique brass, deep terracotta) and using real natural textures instead of shiny plastic. Incorporate dried branches, real velvet, unbleached linen, and warm amber candlelight to create an elevated gothic ambiance that harmonizes with your home.
How do you hang floating witch hats without damaging the ceiling?
Use clear 6-pound monofilament illusion line tied to clear Command adhesive ceiling hooks or small painter-tape tabs on flat painted drywall. Because lightweight fabric witch hats weigh only a few ounces, removable micro hooks hold them securely all season without leaving holes or residue.
What paper is best for making a 3D bat wall?
Heavyweight 65 lb to 80 lb matte black cardstock is ideal. Construction paper is too thin and tends to curl or fade, while high-gloss paper catches glare and looks synthetic. Matte cardstock holds clean, crisp 45-degree folds that cast striking dimensional shadows on walls.
How do you make glass bottles look like ancient apothecary potion jars?
Wash recycled condiment or oil bottles, and mist them lightly with matte frosted spray paint to create a dusty glass patina. Hand-tear paper labels with burnt or coffee-stained edges, glue them with decoupage adhesive, cap with natural corks, and drizzle melted black sealing wax over the neck.
